User Guide
Copyright © 2013 Octopus Newsroom
$Date: 2014-04-30 09:28:02 +0000 (Wed, 30 Apr 2014) $
Table of Contents
- Preface
- 1. Introduction
- 2. Octopus interface basics
- 3. Messaging
- 4. Wires, RSS and E-mail
- 4.1. Reading wires
- 4.2. Commenting on wires
- 4.3. Flash and coloured wires
- 4.4. RSS feeds
- 4.5. How to send a wire message
- 4.6. Attaching items to stories
- 4.7. Internal wires
- 4.8. Creating new wire message in an internal wires folder
- 4.9. Wire message notification rules
- 4.10. Widget configuration
- 4.11. Reading wires in widget rotation
- 5. Story folders
- 6. Scripts
- 6.1. Elements and story templates
- 6.2. Preparing the script
- 6.3. Text formatting
- 6.4. Timing your script
- 6.5. Spell check and banned words
- 6.6. Attaching items to stories
- 6.7. Selecting media
- 6.8. Adding MOS objects directly to script editing area
- 6.9. Adding CG commands
- 6.10. Story status colour
- 6.11. Assets
- 6.12. History
- 6.13. Configration options
- 7. Rundowns and Broadcasting
- 7.1. Adding finished stories to rundowns
- 7.2. Working with rundowns
- 7.3. Removing story from a rundown
- 7.4. Renumbering slugs
- 7.5. Rundown timing
- 7.6. Hit time field
- 7.7. Monitoring timing while ON-AIR
- 7.8. Assigning presenters at rundown level
- 7.9. MOS activation
- 7.10. Rundown buddy
- 7.11. Creating a new rundown
- 7.12. Deleting rundowns
- 7.13. Archiving rundowns
- 8. Uploading files
- 9. Tags and Topic bins
- 10. Media and how octopus controls devices
- 11. My octopus
- 12. Contacts and guests management
- 13. Fulltext search
- 14. Stories trash
- 15. Stories archive
- 16. Reports
- 17. CG control
- 18. Shortcuts
- 19. Problem reporting tool
- A. Keyboard shortcuts
List of Tables
- 18.1. Common list shortcuts
- 18.2. Common editing shortcuts
- 18.3. Wires/RSS list shortcuts
- 18.4. Story folder list shortcuts
- 18.5. Rundown shortcuts
- 18.6. Script editor shortcuts
- A.1. Script
Preface
OCTOPUS is the name of your computerised newsroom system, which will connect everybody in the newsroom, regardless of their role or location. OCTOPUS will benefit each of you in different ways, depending on your job, but it is essential that everyone understand the basics of how it works.
This is an essential guide to OCTOPUS, with the basic information about how to log on and off, and how to use the system.
OCTOPUS at your organisation may be configured differently than shown in this manual. Menu options will vary according to modules used by your organisation, story folders will have different names and rundowns may be organised in a different way. Ask your OCTOPUS system administrator if you think something is missing or configuration changes are required.
Chapter 1. Introduction
1.1. How to Access Octopus
Every user needs their own specific login name and a password to access OCTOPUS, this can be configured to be either integrated with your domain username and password or a separate username and password stored within the OCTOPUS database can be used. Regardless of the configured authentication method, it’s important that you log on under your OWN name and not anyone else’s. If you use someone else’s login, messages that you send or receive will be under their name, not yours. User rights are configured for each user according to their role, so therefore you may not be able to perform your usual functions under another users login. User actions are logged according to username also, so ensuring logins are not shared also avoids anyone being wrongly blamed or credited for other users work.
1.2. Logging On and Off
Whether domain integrated authentication or separate Octopus user authentication is used, the login procedure for users is the same. If OCTOPUS has previously been installed on the PC, you will see a blue icon labelled Octopus6 Client on the desktop, all you need to do is double click this icon to launch the application. There will be an authentication window where users need to enter their username and password and then click OK. If the blue Octopus6 icon is missing, OCTOPUS may not be installed, in this case you can simply install the application by opening your web browser and entering the address http://name_of_OCTOPUS_server. You should then see a webpage titled OCTOPUS6 containing a link titled Launch Octopus Client, just click on the link and the client will be installed on your PC.
It’s just as important to remember to log off the system when you finish using it so that you do not take up a client license unnecessarily. Close the OCTOPUS client by clicking on the at the top right of the application window, and then to logoff the PC choose Log Off from the Windows START menu.
Chapter 2. Octopus interface basics
2.1. Interface basics
Here you can find some common user interface features you may know from other applications like drag and drop and also features that are used everywhere in OCTOPUS.
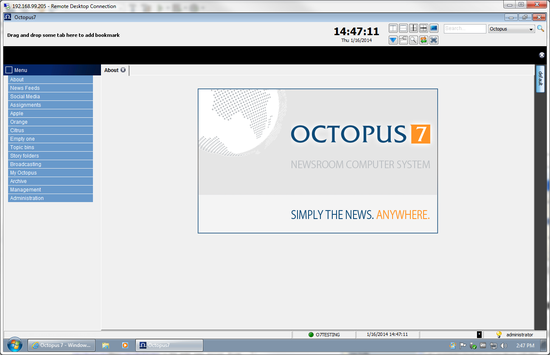
Basic OCTOPUS Screen
2.2. Main Menu
The OCTOPUS menu is on the left hand side of the screen, you will see a list of the folders that are available on the system.
On most systems you will see these essential areas:
-
Agencies/Wires
-
Assignment desk
-
Pools/Story Folders
-
Rundowns
-
My OCTOPUS
-
Media
Clicking on each folder or subfolder will display its contents in the selected working area (known as a split). The top level folders are darker blue, they may contain additional subfolders, clicking on a top level folder will reveal any subfolders or if there are none the contents of this folder will be displayed in the active split.
The folders available to each user are dependant on user rights. Therefore, you may see a different menu to your colleagues. That means that you have been granted or denied access to different folders in the OCTOPUS menu.
At the top left of the main menu you will see a small square, clicking on this square will hide the menu. This option allows you to have more space for the main working area of OCTOPUS. When the menu is hidden, just click the small square on the top of the menu bar to display the menu.
2.3. Toolbar
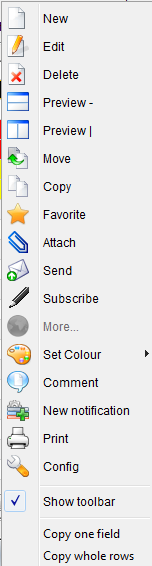
Each section has a toolbar including buttons for file actions such as New, Edit, Move, Copy or Delete.
Caution
To execute some of the actions you need to have at least one row selected from the list.
Some of the buttons also have submenus containing more actions, these can be seen by clicking on the on the right side of the button.

Toolbar with Default View
It is possible to change the look of the toolbar by any toolbar button and choosing from the available views: Text Only, Text Under an Icon, Text After an Icon or Icon Only.

Toolbar with Text Only View
If there are more buttons than can fit the screen (usually when the screen is split horizontally) an will appear on the right of the toolbar. By clicking on this arrow the additional options will be displayed. If a button is greyed out, the option is unavailable. Toolbar actions can also be accessed from context menus that appear after right clicking one of the items in the list.
Wires List Context menu
2.4. Keyboard shortcuts
Almost every action and button in OCTOPUS has a keyboard shortcut. Keyboard shortcuts for toolbar buttons can be seen by hovering the mouse pointer over the button. A full list of keyboard shortcuts is available in Appendix A.

Edit button with the Keyboard Shortcut
2.5. Selecting list item(s)
To select items from the list users can left click with the mouse or use the up and down arrow keys. More than one item can be selected by holding the Ctrl or Shift keys and clicking. Using the Ctrl button you can multi-select random items, holding the Shift key allows selection of a block of items. To select all items in a list, press Ctrl+a.
2.6. Tabbed folders and split screens
It is possible to have multiple folders open within one split of the main working area. To open a folder as a new tab hold the Ctrl key on the keyboard and the desired folder from the main menu. Click on the tab header to switch between the tabs. To close a tab, click on the on the right of the tab header.

Tabbed folders
To reopen previously closed tabs, users can click on the Undo close tab button (Icon with Orange and Green arrows) on the Desktop Actions toolbar. Clicking on the blue triangle icon on the same toolbar will display a list of open tabs in all splits; you can select any tab from here and it will become the active tab.
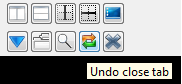
Desktop Actions Toolbar with tooltip
It is also possible to split the screen into multiple working areas. When you split the screen each split can contain different folders and multiple tabs, so for example you can be editing a story in one split, have the rundown open in another and be browsing multiple tabbed wire folders in the third.
There are four buttons on the Desktop Actions toolbar for splitting the screen. The first white icon with the vertical line down the middle can be used to split the entire working area vertically. The second white icon with the horizontal line through the middle can be used to splitting entire working area horizontally. There are two more grey buttons on this toolbar which can be used for splitting the current split either horizontally or vertically, this allows the user to create any number of split windows within the main working area.
The X icon on this toolbar closes the current split. There is also an option to merge all splits into one and keep all the folders open as tabs, this can be achieved by clicking on the merge all splits button (the icon looks like several folders on top of each other).
In Addition to the Desktop Actions toolbar, the following options related to each split are available by right clicking on the tab header: Reopen, Split Current horizontally, Split Current Vertically, Close this tab, Close all but this tab, Close Split.
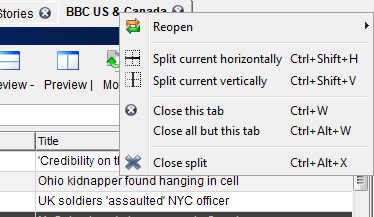
Tab Header Menu
Another way of creating new splits is to on a tab header and then drag it to any edge of the working area, you will see a blue or green highlight when it is possible to drop this tab and create a new split. The green highlight will split the current split and the blue highlight will create a full horizontal or vertical split.
Drag and Drop Split Current
Drag and Drop Split
2.7. Saving your layout
When you close the OCTOPUS client your current layout will be saved; this layout will be restored automatically when the client is next opened.
Tip
It is also possible to save the screen layout which will save all open splits and tabs.
This can be achieved by clicking on the blue icon on the top right of the Tabs and Splits toolbar and then choosing or . Once you have saved the desktop layout you will see the new layout available in the desktop layout bar on the right of the screen, just click on the name of the layout to reopen the saved layout.
The following layout options will be retained when the OCTOPUS Client is next started:
-
Splits
-
Tabs
-
Folders
-
Menu expansion
-
Forms (chosen columns, size of columns)
2.8. Forms
In any list view it is possible modify the form by adding/removing columns and by resizing or moving the columns. clicking on one of the column headers will display a list of all of the available columns. Columns that are part of the form already will show in this list with a tick mark on the left, choosing one of these will remove the column from the form. You can also remove a column from the form by clicking the column header and choosing Remove Column 'name of column.' To move a column within the form, just click on the column header and drag and drop the column to the new location. Resizing columns can also be achieved by drag and drop, hover the mouse between two column headers and you will see the mouse pointer change to a double headed arrow, then click and drag and drop to resize the column on the left. There is an option available on the form menu to toggle form protection, apply this to the form if you plan to temporarily modify the form, but don't want the changes to be saved for next time you use the form.
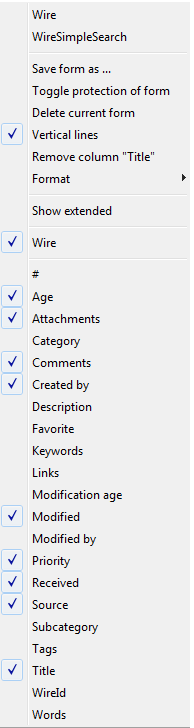
Wires Form Menu
In addition to OCTOPUS automatically saving list forms, it is possible to create saved forms. Just configure the form as described above and then choose the option to from the menu. You will be prompted to name your saved form; after clicking your saved form will then be available to be chosen from the menu. To delete a saved form, you must first select the form and then choose from the form menu .
2.9. Drag and drop
Items can be drag and dropped from one screen to another to perform specific actions. For example a story can be dragged from a story folder in one split and dropped into a rundown in another. The order of slugs in a rundown can be easily modified with drag and drop as well. To drag and drop a single item, just click on the item and hold the button down until you have moved the mouse to the drop location and then release the . To drag and drop multiple items you can either select a block of items by holding the Shift button down and then clicking with the mouse or pressing the Ctrl button and clicking non-sequential items from the list.
Caution
When you drag and drop a story in Octopus, by default it will copy the story to the new location (the default drag and drop behaviour can be changed to move by system administrators).
Drag and Drop with the Shift key pressed will move the item to its target, Ctrl pressed while dragging will copy the item, Ctrl and Shift pressed simultaneously assigns the item to another folder. The mouse pointer will also help you to recognise the type of an action that will be performed:
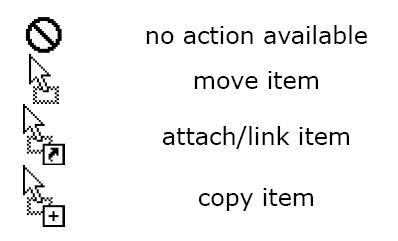
Mouse pointer description
2.10. Sorting a list of items
To sort a list according to one of the fields there you can click the column header. When you click again, sort order will be opposite. You will see a small up or down arrow in the column header indicating that the list has been sorted by this column and whether the search is ascending or descending.

Column Header with Ascending/Descending Sort Arrow
2.11. Quick search
Quick is available in all item lists. Just start typing the while the focus is on one list item and all matching words from the list will be highlighted and the first match will be selected. You will also see that Quick Search entry box has appeared just below the tool-bar, here you can see the current quick search text and just click on the button to see the next matching item.
Caution
Quick search searches only in titles, not in content of the stories for example.

Quick Search
2.12. Favourite and frequently used folder buttons
You can easily add favourite folders to the favourites list by clicking on the tab header and dragging this to the favourites area on the top left of the screen. To return to the folder later, click on the newly created favourite button and the folder will open in a new tab in the current split.
The six buttons on the top right of the screen with blue labels are the six folders most frequently used by the current user. These are calculated by OCTOPUS according to which folders the user accesses the most. Clicking on one of these buttons will open the folder in a new tab in the active split.

Favourite and Frequently Used Folder Shortcuts
Chapter 3. Messaging
3.1. Messaging
The messaging system is an essential way for everyone in the newsroom to communicate. It’s a good idea to get accustomed to using it efficiently. The messaging contact list can be accessed by left clicking on the username with the light bulb icon at the bottom right of the OCTOPUS screen; right clicking on the same username and light bulb icon will display a context menu with options including Send Message, Start Chat, Status and Config. As you will see from the messaging on-line status screen-shot below, the yellow light bulb indicates that a user is on-line and the white light bulb indicates off-line status. Other options available include Away, Do Not Disturb and Not Available. Users must both have added each other as contacts before they can see each others status, otherwise their status will be blank.
Messaging Contact List
Messaging Online Status
3.2. Managing contacts
To add a new contact click on the menu button in the contact list window. There are two options for managing contacts, Add User and Remove User. When adding a user, you should be able to just type the first two or three letters of the users name and then choose the contact from a drop-down list and click OK. Choosing remove user will remove the selected user from your contacts list.
3.3. How to send instant messages
From the contact list window, right click on a contact name or group name and choose Send Message. You can add more message recipients for this message by either typing the start of their username into the top text entry box and then clicking on the matching user, or by clicking on the '…' button and making a selection from this multi-select list. Then just type the message into the lower text entry box (maximum 255 characters) and click the Send button. Optionally you can click the Urgent Message checkbox if this should be sent as an urgent message, or if you have the OCTOPUS SMS module available it is possible to click the Send as SMS checkbox to have the message forwarded to the users mobile via SMS. You can add the recipients to your contacts list by ticking the Add to Contacts tickbox.
Send Message Window
3.4. Receiving messages
Instant messages are received in the system widget/notification area, this is the black (by default) area at the top of the screen (for more details on Notifications see page 29 in the Wires, RSS, Mail chapter). When the message first arrives it will flash in the notification area.

Incoming message
When the flashing stops you will see the messages listed in this area in order of arrival. You can reply by right clicking on the message and choosing reply, double clicking will also open the send message dialogue.
List of Messages In Widget
3.5. Sending agency wires via messaging
Agency wire messages and messages from RSS feeds can be sent to other users via messaging; this can be done by clicking on the Send button on the wire folder toolbar while the wire message is selected in the list. The recipient can double click on the the wire message in their system widget and this will open the wire message in a new tab. Wire messages can also be sent by dragging from the Wires list onto a contact name in the Contacts list.
3.6. Chat
o start a chat, right click on a user or group in your contacts list and choose Start Chat from the menu. This will open a new chat window. The chat section in Octopus has three parts, the lower section is for typing the messages. The top right area displays a list of the users that have been invited to the chat. The upper left part of the chat shows all messages sent and received including the username of sender and time sent next to each message.
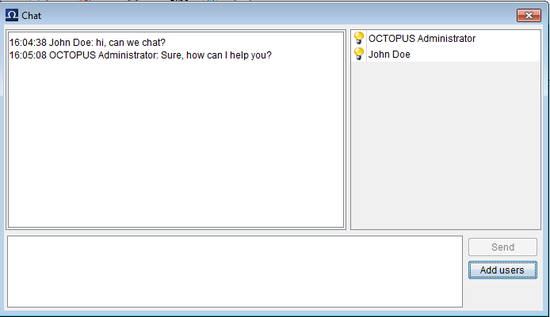
Chat Window
When the first message is typed and sent a chat invitation is sent to the users that are part of the chat. The chat invitation arrives in the notification area/widget in the same way as an instant message. The recipient can double click on the chat invitation to accept and this will open the chat window. Right clicking will display all available options including Chat and Dismiss Message.
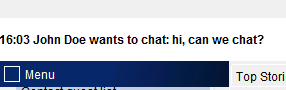
Chat Invitation in Notification Area
3.7. Messaging groups
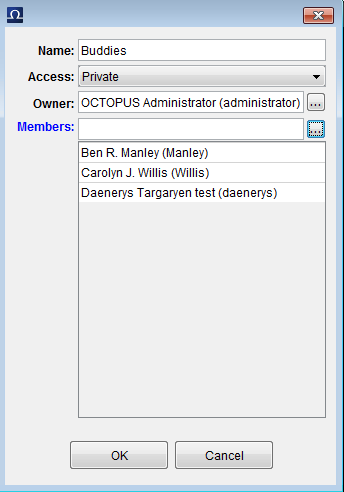
Right clicking on a group in the contacts window will display a menu with two options; Send Message and Start Chat. Send message sends an instant message to all users in the group, Start chat sends an invitation to join a chat to all users in the group and opens a chat section with group members added. To expand or hide the contents of user groups in your contacts list, double click on the group name in the contact list. User rights groups can be configured by your administrators to be displayed as messaging groups as well so you may see these available for selection in your contacts list. You can also create messaging groups yourself, this option should be available in the main menu under My Octopus/User Groups. In this section you can click the New button to create a new user group, type the name for your group into the Name field. You can choose whether you want other users to see/modify the group by choosing the Access, the options are Private (only you can see the group), Public Read-Only (Other users can see the group) or Publicly Modifiable (other users can make changes to the group). The Owner field allows administrators to change who can modify a Public Read Only group, typically you can leave this as your own user account which is the default. Adding members to the group can be done by typing a few letters from the users name into the Members field and then choosing from the available matches.
New User Group Dialogue
3.8. Messaging setup
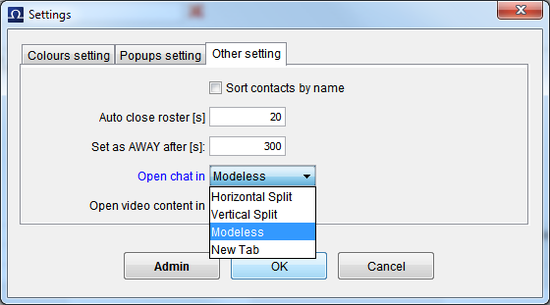
To access messaging set-up options click on the Contact list Menu and choose Config. Under Popup setting you may check a tickbox that allows showing popup windows for incoming message and times after which it is closed automatically. The Settings tab has a tickbox that allows sorting contacts alphabetically, the Auto Close Roster is a number of seconds after which the Contacts list will close, Set as Away after is a number of seconds of inactivity after which status will automatically be set to Away. The Open Chat In setting allows changing the way the chat opens, the options are either Horizontal Split, Vertical Split, New Tab or Modeless (A small separate window).
Messaging Account Settings
Chapter 4. Wires, RSS and E-mail
All messages from wire agencies are located under the WIRES option on the main menu. Wires are automatically filtered into folders according to their source agency, topic, priority or category. This folder structure can be customised by your administrator. Attachments sent by the agencies such as JPEG files can also be received and displayed in OCTOPUS. In addition to wires from the agencies, RSS messages and incoming emails can be received and shown in OCTOPUS. These sources of information are presented in OCTOPUS like wires.
4.1. Reading wires
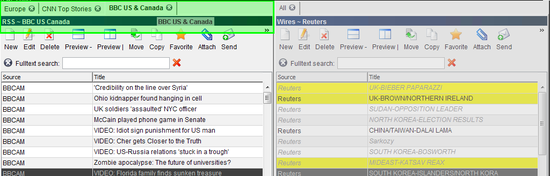
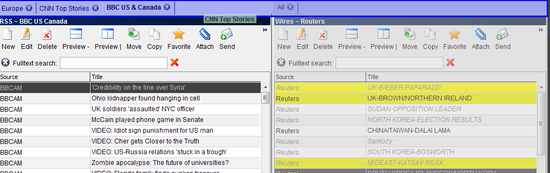
To view the contents of a folder, click the appropriate item on the menu. After doing so, a list of items will be displayed with the newest one at the top. There’s no need to manually refresh the list, newly arriving messages will be added at the top of the automatically. To read the body of the wire message, just double click on the item and the message body text will be displayed in the current tab. To return to the list, click the Close button on the toolbar. To browse to other items without returning to the list, click on the Next or Previous buttons on the toolbar while viewing the wire message. There is also a wire preview mode, this allows you to view the list of items at the same time as viewing the body text of the selected wire message. There are two types of preview mode, horizontal or vertical, allowing you to choose whether to position the wire preview either below or to the right of the wire list. Another option is the extended mode, this allows a configurable number of lines of the wire body text to be displayed in the list. Wires with attachments will have a paper clip icon in the Attachments column, right clicking on this icon will give options for opening or saving the attachment outside of OCTOPUS. Attachments such as JPEG files can be viewed in a normal wire message window in OCTOPUS as well, when a wire with an attachment is open or previewed there will be an attachments bar at the bottom of the message which will give options for opening or saving the file also.
Wire Preview Mode
4.2. Commenting on wires
In OCTOPUS you can comment on wire messages just like articles on the Internet portals. As most wire messages from agencies should be configured as Read-Only, this is a useful way for users to update the wire with additional information. Just click the Comment toolbar button and the comment dialogue window will open. If you want to comment a wire message, just type your comments and click OK. Previously added comments can be seen in the comments section of wire messages, which is displayed on the right of the wire message body. Additional options available in the wire comments section allow editing or removal of comments; by selecting the comment and clicking on the Edit or Remove buttons. Adding, editing or removal of wire comments is based on user rights defined by the administrator.
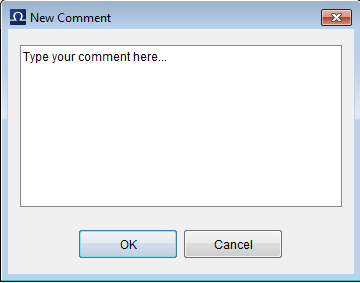
Comment dialogue
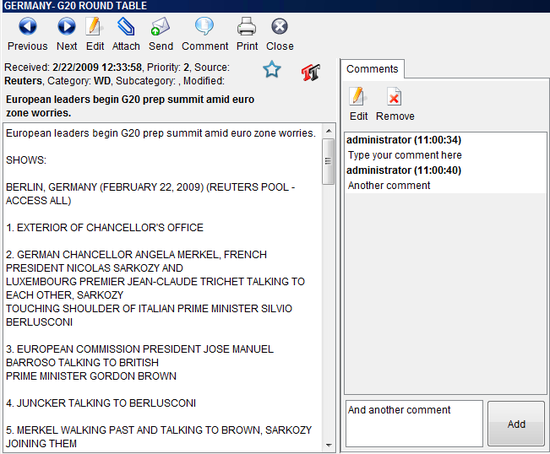
Wire message with Comments Section
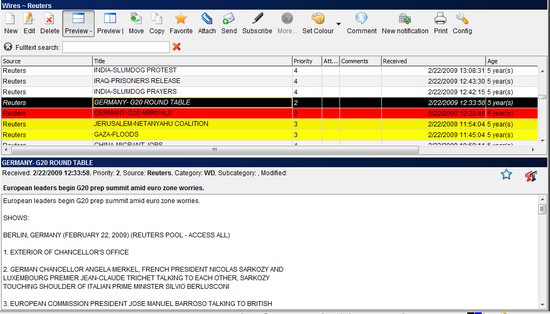
4.3. Flash and coloured wires
Wire messages of particular significance can be highlighted in configurable colours. For example FLASH wire messages, possibly those defined as a priority 1 or 2 by the news agency can be highlighted red in the list of wire messages. Any number of highlight colours can be defined by the administrator based on wire rules according to the priority, source, subject, keywords, category or subcategory. If you think that a wire message should be coloured and it is not, you can do so by clicking Set Colour button on the toolbar, or by right clicking on the wire in the list and choosing Set Colour from the context menu. The option to set colour can be restricted by user rights, as these highlight colours are seen by all users of the system once applied.
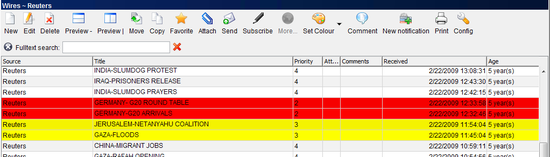
Wire list with Flash wires
4.4. RSS feeds
RSS feeds are links to Internet articles, which are automatically downloaded to OCTOPUS wire folders. It is possible to extract all text from the RSS page and display this in OCTOPUS or if preferred just a short description can be displayed with the option to follow a link to the source of the RSS feed. There are several ways to go to the source of the RSS feed; clicking on the More button in the toolbar, double clicking on the globe icon in the links column of the list, or if the item is open or previewed there will be a globe icon in the Links bar below the message text. Options available for wires are available for RSS feeds as well, such as commenting and setting the colour.
4.5. How to send a wire message
If you want to alert somebody else about wire message or RSS feed you can send the item via OCTOPUS messaging. After selecting the wire message in the list, you can click on the Send button on the toolbar, or right click on the message and choose Send from the context menu. This will open the send message pop-up window and the wire can be sent as described in the messaging section of this guide. Wires and RSS items can also be sent by drag and drop onto a contact in the messaging contacts list.
4.6. Attaching items to stories
When you find a wire or RSS that is a useful source of information for a story, select it in a list and click on the Attach button or right click on the item in the list and choose Attach from the context menu. This will attach the item to the story; the item will now be available in the assets section of the story.
Attach dialogue Window
To view story assets, just click the Assets button from the story toolbar. The assets section will open on the right of the story; you will see a list of the assets and selecting one of these will display its content just below the list in the asset section. Double clicking on the asset will open the wire/RSS in a new tab. You can easily select and drag and drop a block of text from the asset into the body of the script. The wire remains attached to the story until it is removed from OCTOPUS, so therefore you have all the source data available even for archived stories. You can use Quick Search to find stories in the Attach dialogue; it is also possible to filter the stories to show only those from Today, Yesterday or This Week. If there is more than one story with the same name, you can click in the '#' column for that story and this will display where the story is located in OCTOPUS.
Assets Section Displaying a Wire Asset
4.7. Internal wires
Administrators can set up folders for you to create internal wires, user rights would be configured to allow creation and modification of wires within this folder. This is the place where your correspondents and external reporters can place their stories.
4.8. Creating new wire message in an internal wires folder
Click the New button on the internal wires folder toolbar to add a new wire. Fill in the name in the Title field. The title should be descriptive, but brief; this is the first thing that all others will see when they browse the wire. The following fields are optional, but should be used if you have configured filtering rules based on these fields – priority, category, subcategory, and keywords. The source will be filled automatically with your login name when you save the wire. The body of the wire can be entered in the area below, there are many formatting options available from the formatting toolbar or context menu; right to left, text colour, text size, bold, italic and underline. It is also possible to attach a file such as PDF or JPEG to the wire, this would then be available for viewing in OCTOPUS.
4.9. Wire message notification rules
This allows you to set up rules to notify you when a new wire story matching your search criteria arrives. This is also called forward search. The New Notification Rule button on the wires toolbar allows creation of a new rule. Enter a name for the new rule into the name field of the Rule Editor window, enter the search terms into the Query section; the operators AND, OR and NOT can be used and regular brackets. Tick the boxes for Title, Keywords and Text for each of the fields that should be searched. In the folders section you can choose which wire folders the rule should be applied to, either tick the Apply to all folders box at the top, or select folders from the list below. The options section allows you to Store wires in a folder, or to allow others to use or modify the rule. To be alerted when new matches to your search arrive, you will need to either create a new widget or add the rule to an existing widget. To modify a notification rule, locate to the Notification Rules menu option, your rule should be listed here, highlight the rule and click on the Edit toolbar button.

Notification Rule Editor
4.10. Widget configuration
Widgets display the results of notification rules. To create a new widget you can tick the option to Create a New Widget for This Rule when creating a notification rule or you can right click anywhere in the widget section (next to messaging at the bottom right corner of the screen) or on an expanded widget and choose Create New Widget.

Expanded Widgets
Widget Section with Context Menu
To configure a widget, right click on the widget in the widget area at the bottom of the screen or on the expanded widget and choose Configure Widget from the context menu. Enter the name of the widget into the Name field at the top. Choose a colour scheme by clicking on the coloured squares in the colour scheme section and choosing colours from the palettes; the two squares at the top are the text colour and background colour respectively for normal wires, the squares on the second row allow selection of the text colour and background colour for urgent wires. The settings section allows users to choose the preferred type of scrolling for the notification messages; there are four options – horizontal, vertical, continuous and multi-line. Message Queueing means that new messages will flash/blink in the expanded widget on arrival. Right to Left Text Direction will right align messages or scroll from right to left according to the type of scrolling that is set. There are options for changing the blink duration and the blink rate to set how long and how fast the widget will blink/flash for when a new notification arrives. The Rotate Notification After sets a time threshold for bringing the rotation back to the first wire in the rotation (between 1 second to 30 minutes). To set a limit on how many wires can be in rotation you can use the Max Number of Notifications slide-bar (between 10 to 1000). There is an additional option to choose a sound to alert you when a new wire or urgent wire arrives. On the right hand section of the widget you will see the applied notification rules; all public rules and rules that you have created should be available to be ticked/unticked.
Widget Configuration
4.11. Reading wires in widget rotation
To read a message that is in the current widget rotation just click on it when it is displayed in the expanded widget, or click on the orange down arrow which will show a drop-down list of all the wires in rotation and then click the message, this will open the wire in a new tab. Right clicking on the widget in hidden or expanded mode will display a context menu which includes in addition to configuration and creation of widgets; options to Delete Widget, Hide widget (widget will not be displayed in the expanded mode), Read All Alerts (Mark all alerts as read), Delete All Read Alerts and Delete All Alerts. In expanded mode you will have Mark As Read as an additional option which applies to the wire that you clicked.
Chapter 5. Story folders
The main working area for everybody is either the story folders and/or rundowns.
Stories are usually organised in subfolders and each user has different access according to user rights.
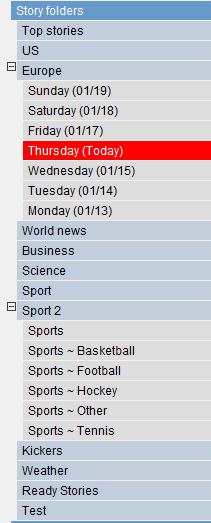
Story Folders in Main Menu
The number, names, nature and location of folders depend on your workflow and your Octopus administrator can to modify this. Whenever there is a need for an extra folder, ask the administrator for help.
Usually the main working folders are Assignment desk (that can be split to Today, Futures and other folders) to compile information on everyday news coverage and Story Pools (for example for News, Sport, Business etc.) for all the actual stories the rundowns can be build from. These folders require similar information on every story.
To CREATE A NEW STORY press the button in the story folder toolbar and fill out the following details:
- Name (mandatory field):
-
the slug title of the story, two or a maximum of three words, which accurately describe the story, e.g. DHAKA FLOODS
- Planned duration (optional):
-
how long will the story be? This includes all story elements. For example ST/VO story scheduled duration is count of both times: STUDIO intro and VOICE OVER. This planned duration is not limiting users in any way, however, if it's set, reporters should try to prepare the scripts as close to this duration as possible.
- Template (optional change of default):
-
select from predefined story templates. Is it anchor INTRO, VO or PACKAGE? If you are missing the template here, ask your administrator to add it.
- Schedule (optional):
-
the dates determine which date the story will be assigned from/to.
- Should be recorded (optional):
-
check this field if the video material is not yet recorded.
- Reporter (optional):
-
you can select name(s) from the list (by clicking on (...) to show who is reporting and shooting any story. This is essential for Assignment desk for creating stories as by selecting reporter(s) here you assign access to it. Also selected reporter will have the story in his MY STORIES folder automatically. You can select more reporters by holding the CTRL button while clicking on the names.
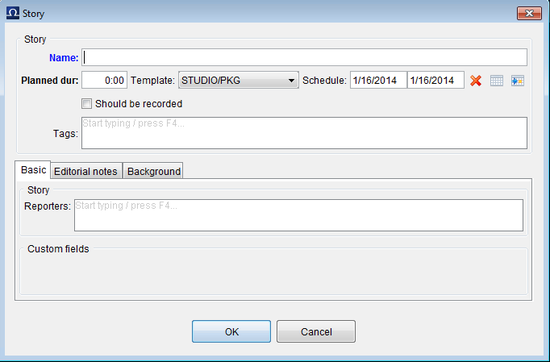
Story Properties dialogue
There can be more fields in Story Properties dialogue that have special meaning for your organisation. These fields will be displayed in the Custom fields block in the bottom part of the dialogue window.
5.1. Description tabs
Everyone should get into the habit of clicking one of the Description tabs in the Story properties dialogue to fill in additional information about the story. It’s where reporters give Producers additional information about the story, the visuals that will be gathered, the SOTs, whether PTC is planned and if so, where; plus the details about whatever GFX or FILE PIX that will be needed.
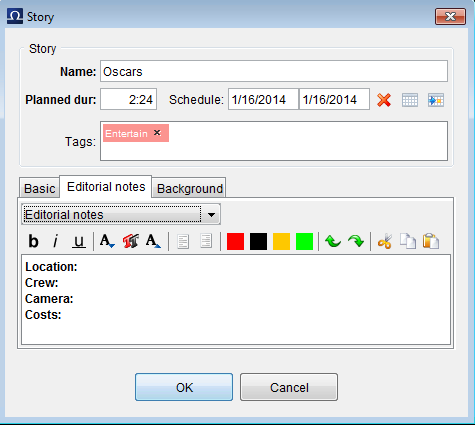
Background Description Tab With Template Applied
In certain environments, one description field is not sufficient to cover the workflow needs. Let's say you'd like to keep technical description of the story separated from the editor's ideas of story content. The system administrator can define multiple description fields, which will be shown as separate tabs in the story properties dialogue window as well. Also, multiple templates can be defined for all descriptions. This way there can be pieces of text pre-entered upon creation of the story. Templates for descriptions are defined by system administrator.
5.2. Planning/newsgathering/assignment desk folders
For cases where separate planning department takes care of newsgathering/ planning, administrators can disable scripting for certain containers. When a container is set up like this, double-clicking a slugline will open the story properties to allow details to be added to any of the available Description Tabs. When the story is later moved or linked to a scripting container or a rundown, the script side of the story can be accessed and of course all the details added to the Description tabs are available for reference by clicking the EDIT button on the story folder/rundown toolbar.
5.3. Toolbar
There is a number of operations what you can do in the story folders. These options can be found in the toolbar on the top of the page.

Story Folder Toolbar
- New
-
to create a new story.
- Edit
-
to edit the basic information of a story – such as title, planned duration, reporters assigned, etc. This is NOT for editing the script.
- Script
-
to open the script – main body of the story. It is the same operation as if you double-click on the name of the story slug.
- Preview
-
horizontal preview of the script
- Preview
-
vertical preview
- Remove
-
to delete a story from the folder. Story will be removed and moved to the Trash folder.
- Action
-
under this menu option you have a few operations. These operations will be used when you will want to use some of the stories from the folders in your rundown. Operations include:
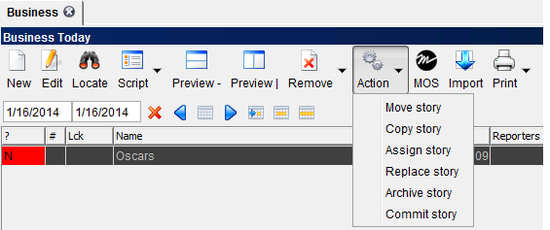
Story Folder Toolbar with Action Menu
-
Move story – to move a story to a different place – it could be another folder or to a rundown. Story will be removed from the current location.
-
Copy story – after copying the story to a different location it will remain in the current folder and will appear in the new location(s) as well. Both versions will have DIFFERENT IDs!
-
Assign story – Similar to copy, however in this case both versions will be linked together. It means, if you make a change to the story in Folder1, the copy in Folder2 will be changed as well. Both versions will have the SAME ID. The assigned story is indicated by the ! and the number in the # column (Number of links). If you double click on it you will get Story location dialogue where you can find all the locations of the selected story - the button is the same function. If there is just ! it means that the story is assigned just in two folders. 3! indicates that the story is assigned in three locations (in two story folders and in one rundown) like on the picture below.
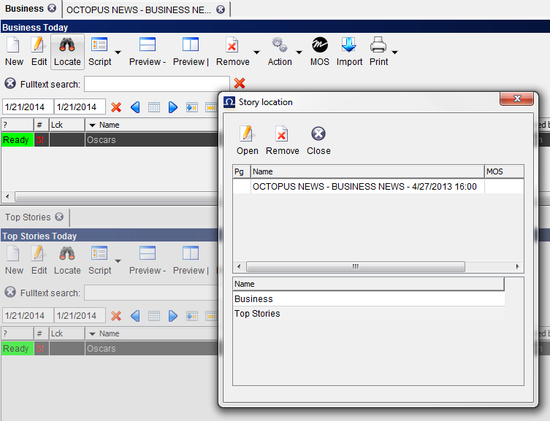
Story assigned in two story folders and in one rundown
-
Archive story – story will be removed from the current location and moved to the Archive folder. After clicking on the Archive button, you will be asked to confirm this action.
-
Commit story -
-
- MOS
-
you might have a MOS button in your folder as well; under this option you can activate the container for a selected MOS device.
5.4. Calendar folders
Plain-text or scripting containers can be also configured to act like a diary. Stories in diary should carry information about their scheduled dates in order to fully utilise diary options.
To schedule a story, simply fill in FROM and TO dates in NEW STORY dialogue window. If a story should be only scheduled for one day, enter FROM date only.
A calendar folder has a simple calendar field right under the toolbar.

Calendar Underneath Story Folder Toolbar
Fill in a date in the FROM field (first field in the calendar form) and to the TO field (second field) to see all the stories scheduled for the selected period.
The two blue arrows (Left and Right) will show you the Previous/Next days and stories schedules.
The button between the two blue arrows will open up a general calendar view, where you can quickly jump to a random date. Days marked with RED in this calendar mean that there are some stories scheduled already.
The last 3 buttons in the calendar form will show you all the stories scheduled for TODAY, 5 DAY RANGE AROUND TODAY, THIS WEEK.
If you would like to create a story for a future date – for example you know there is a conference on the 25th September that you will cover, you can select this date from the calendar, create a NEW story for this date and start working on it any time you want – days/weeks/months before the event.
Chapter 6. Scripts
When a folder is designed to be a scripting folder (on contrary to plain-text story folder) or if the story is accessed via a rundown, a script button is available in the toolbar to edit the script and double-clicking a slug opens the script for the story.
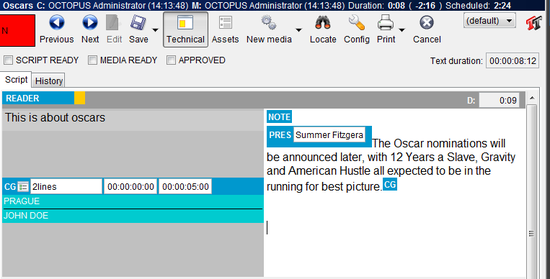
The OCTOPUS script is opens in a double column view by default and has the text editing area on the right hand side and the technical area on the left. Whatever you are writing on the right hand side of the page should be visualized on the left hand side. Each visual sequence should be described on the left hand side. If you are using a graphic, the information about what the graphic includes should be included on the left hand side. If you are using a sound bite, the CG should be included on the left hand side. It is possible to hide or display the technical side of the script by clicking on the TECHNICAL button on the script toolbar.
Script Editor in Double Column View
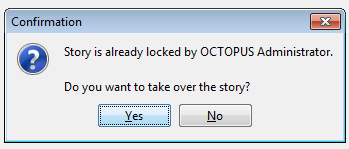
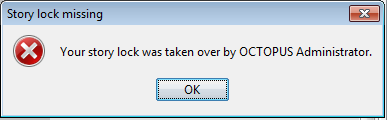
When you first open a script it will be in read-only mode, either click on the edit button on the script toolbar or double-click in the text editing area of the script to start editing – note that once you have the script open for editing it will be locked and other users will not be able to modify the script. User rights can be assigned by your system administrator to allow you to take over a script while another user is editing it, you will be asked to confirm that you want to take over the lock and the other used would receive a message informing them that the script had been taken over and any changes they have made could then be saved as a copy only.
Script take over confirmation
Notification that the script has been taken over
There are 3 different options under the SAVE button in the script toolbar and you can get to them by clicking the small down arrow on the SAVE button.
-
SAVE AND CLOSE – it will save all the changes that have been made and close the script.
-
SAVE – to save all the changes but not to close the script.
-
SAVE AS... - the system will ask you in which folder or which rundown you would like to save your story to and what the new name should be. It will create a new story with NEW ID!
By default, clicking on the SAVE button (not the arrow) will SAVE AND CLOSE your script. If you want to close the script without saving any changes click CANCEL.
If your story is assigned to more then one folder or rundown, you can find the other story folders/rundowns easily by clicking on the LOCATIONS button.
Click on the PRINT button on the script toolbar to print the script.
6.1. Elements and story templates
Every script consists of a number of elements. The commonly used basic types of element are described in detail below. The names of these will most likely differ in your organisation according to local terminology. Your administrator can add story templates which consist of a combination of these elements and any other script content that you want added to a new story automatically.
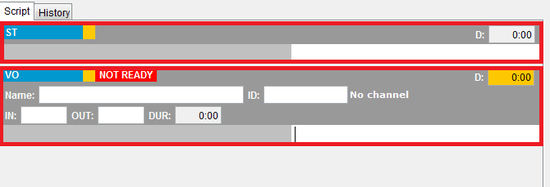
- STUDIO element (also called as ST, Anchor, ANCH, etc.)
-
is usually used for the part of the script when the presenter is reading something in the studio with no video playing on screen. This is commonly used for the introduction to a package or VO.
-
The key properties of this type of element:
-
Duration is calculated automatically from the length of the text based on the reading speed of the selected presenter. When no presenter is selected, duration is calculated based on an the average reading speed defined in the system.
-
There is no video running on the screen – the camera is focusing on the presenters in the studio.
-
When a prompter is integrated with OCTOPUS, the text of this element is usually sent to this device.
-
- VO element (also called Voice Over or OOV)
-
is similar to the studio element, but the main difference is that there is a video playing concurrently while the text is being read by the presenter.
-
The key properties of this type of element:
-
Duration is calculated automatically from the length of the text based on the reading speed of the selected presenter. It means, the duration of the video is not the source of duration for this element.
-
The selected video is played out. Focus on the video and the presenters in the studio can be combined.
-
The text of this element is sent to the prompter.
-
- PKG element (also called as Package, Video, 100, SOT etc.)
-
any piece of video or audio material played from any kind of device. There is no text read from the studio when this kind of element is being on air.
-
The key properties of this type of element:
-
duration is calculated from the ready video clip. While the video is not ready, or no video is selected, duration is temporarily based on the planned duration. As soon as the video has Ready state, it will change to the duration of the video.
-
Video/Audio is played out.
-
Usually there is no text sent to the teleprompter (it can be alternatively configured in a different way, but usually it makes no sense to do so).
-
- LIVE element
-
is used when live report or feed is schedule for the show. The duration of this element is based on the planned duration of the story.
-
The key properties of this type of element:
-
Duration is based on the planned duration of the script
-
There can be a cover video running on the screen, usually mixed with some live camera shots from the location
-
Text can be sent to the teleprompter, it is based on the configuration.
-
On the screenshot below you can see a script with 2 empty elements inserted by default – a ST (Studio) and a VO (Voice over):
Script with ST and VO elements
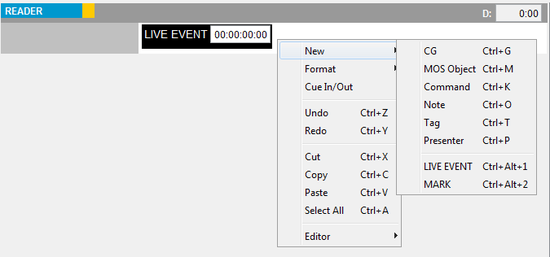
To INSERT a new story element right click on the light grey field under the last element and select NEW and the type of element you would like to insert.
To DELETE a story element, click with the right button of you mouse on the blue title field of the element you would like to delete and click on the DELETE option.
To CHANGE the element type, click with the right button of you mouse on the blue title field of the element you would like to change, select CONVERT and the type of element you would like to use instead of the current one.
To ORGANISE the order of your elements, click with the right button of you mouse on the blue title field of the element you would like to change and select MOVE UP or MOVE DOWN. Another option is to click with the LEFT button of your mouse on the blue field of the element you would like to move, drag it and drop on the blue filed of the element that should FOLLOW the one being moved. If you would like to move an element to the end, drag and drop it somewhere below the last element.
The other options in this context menu are:
- MOS
-
to insert a MOS object, such as Video or Graphics to the element, show the clip, remove a clip or to launch an active-x.
- Collapse All
-
To hide the technical part and the script part of all the elements and show only a brief list of the used elements
- Expand All
-
To show the technical and script part of all the collapsed elements
- Cut
-
to cut one element (i.e. Copied and Deleted)
- Copy
-
to copy one element
- Paste
-
to insert a copied element
- Editor
-
provides the same options as in the script toolbar on the top.
6.2. Preparing the script
The text editing area is the part where anchors write and edit their speeches. Reporters also write VOs for their packages here. Whatever text you write into the editing area, it will appear on the teleprompter after saving the script.
Editing Area
All the actions with story text are called from a context menu, which appears after right-clicking a script text part.
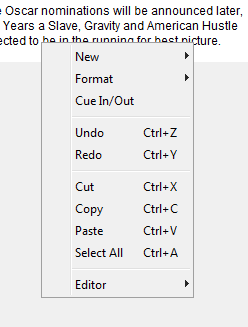
Script Context Menu
In addition to the formatting options already covered in this chapter, the editing area menu options are described below.
-
Cut – To copy and delete a part of the text.
-
Copy – To copy the text.
-
Paste – To insert a previously copied text.
-
Select All – To highlight the whole text.
-
Editor – Same options as in the toolbar.
When you finish your scripting, you should fill CUE IN and CUE OUT words. Every reporter should do this and the script should not be approved without CUE IN/OUT corresponding with the package or sound bite, as these are very important for directors in the control room during live broadcast.
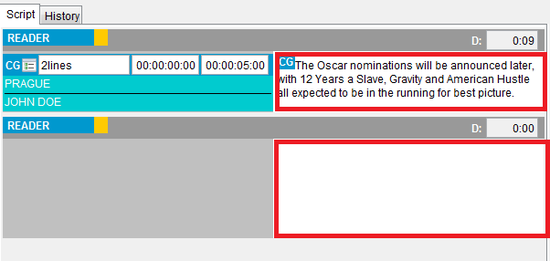
You can also insert a NOTE for the director or editor, click with the right button of your mouse in the place where it should appear and select NEW > NOTE. Type the note in the yellow text entry field that appears in the technical area. This text will not be sent to the Teleprompter and it is only available to read here in the script.
6.3. Text formatting
To format a word, part of the text or the whole text field, highlight the text you would like to work with (you can see the duration of just selected text in the right upper corner of the script in the "Selected text duration" field), click with the right button of mouse and select “Format”.
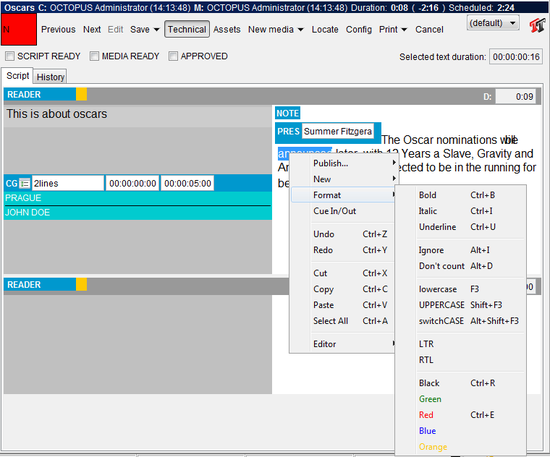
Text Formatting Context Menu
Formatting options in the text field of your element include the following:
-
Bold – To change the text to bold.
-
Italic – To change the text to italic.
-
Underline – To underline the selected text.
-
Ignore – the IGNORED text will NOT be calculated in the duration of your script and will NOT be sent to the teleprompter
-
Don't count – the text will NOT be calculated in the duration of your script but it WILL be sent to the teleprompter
-
LTR – To change to orientation of a part of your script to Left To Right.
-
RTL - To change to orientation of a part of your script to Right To Left.
-
BLACK/GREEN/RED/BLUE/ORANGE – Format the colour of your text or part of the text. If your prompter supports it, then these text colours will be appear on the prompter as well.
To change the font or font size, click on the FONT options button at the top right of the script. This will then display options to change the font and font size for the script.

Font Options Button

Font Options
6.4. Timing your script
You should follow some rules to time your script to meet duration scheduled by the assignment desk. Firstly, all text in the script editing area should have the presenter assigned. This will ensure that the duration is based on the reading speed of this presenter (everybody should set up their reading speed in the USER PROFILE – see the section My Octopus – User Profile for guidance). The easiest way to INSERT A PRESENTER is to place your cursor at the beginning of the text and press CTRL+P. Another option is to click with the right button of your mouse and select NEW > PRESENTER.
A PRES field will be inserted to your script that will enable you to select the person who is going to read the text. Type the first few letter of the name of the presenter to the text field (in the Blue PRES box) and let the system fill in the name of the anchor.
You can insert more then one presenter in each element. On our screenshot below, Presenter 1 will read the text in the red box, while Presenter 2 will read the text in the blue one. The header of each element displays the elements duration on the right.
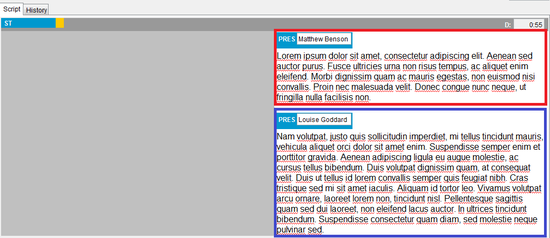
Studio Element with Two Presenter Tags
Secondly, the correct clip should be selected for every package and/or VO that either has the desired duration or the correct IN and OUT times should be added.
Total duration of a story is displayed in header part of the script; as is the below screenshot which shows a story that was planned for 2 minutes and now is 3seconds longer than expected.
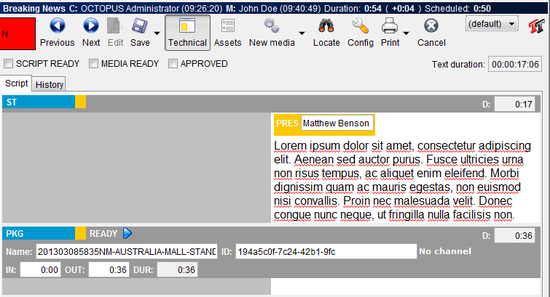
Script Timing with ST and PKG Elements
There is also field for Text duration which is also visible in the above screenshot. It shows the duration of the text in the currently selected element. Or, if you highlight a block of text it will show the Selected Text Duration.
Duration of each element is automatically counted based on text, special tags and media assigned to it. Different rules are used for different types of elements. For example package or video element (PKG) is based on planned duration until a READY video clip is assigned. From this time duration of element is equal to duration of the clip. VOs (voiceovers, OOV) or graphics elements are live anchored so the duration is always counted from the text part of the element and not the clip. You should make sure that the clip assigned to a VO element is not shorter than the text duration.
There are two options which allow you to include text in the script without them being included in the duration; IGNORE and DON'T COUNT.
-
Ignore ALT+I – highlight the text to be ignored, click with the right button of your mouse and select Format - Ignore. The IGNORED text will NOT be calculated in the duration of your script and will NOT be sent to the teleprompter. Alternatively you can select the text and press ALT+I or insert double round brackets around the text to be ignored ((ignored text)).
-
Don't count (ALT+D) - highlight the text, click with the right button of your mouse and select Format - Don't count. The text will NOT be added to the duration of your script but it WILL be sent to the teleprompter. Alternatively you can select the text and press ALT+D or put enclose the text in double angle brackets. This is especially useful when instructions or choreography is to be sent to presenter.
Extra tags indicating duration of soundbites or natural sound can be inserted into the script text. These are then counted together with the text duration to calculate the overall story duration. To insert a duration tag, right click in the text where you want to place the tag and select NEW > TAG. A DUR 00:00:00:00 Field will be added in the text where you can insert the duration of the this tag. The time is usually set as HH:MM:SS:FR.
New Tag Menu and Duration Field in Script
6.5. Spell check and banned words
OCTOPUS has a spell checker, your misspelled words will be UNDERLINED WITH RED COLOUR. To see the correct spelling options, click on the underlined word with the right button of your mouse. To change to a different spell-check language, click on the Config button on the script editing toolbar and then select the language from the Spell-checker language drop-down list.
If a word is UNDERLINED WITH BLUE COLOR, it means you have typed a word that is in the banned words list. To see an explanation of why you should not use that word and to see the alternatives, click on the word with the right button of your mouse.
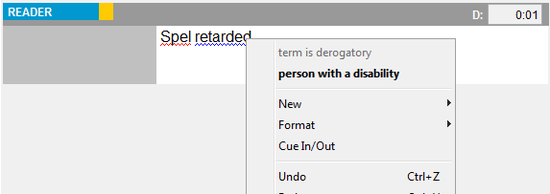
Spell Check and Banned Words in Script
6.6. Attaching items to stories
When you find a wire or RSS that is a useful source of information for a story, select it in a list and click on the Attach button or right click on the item in the list and choose Attach from the context menu. This will attach the item to the story; the item will now be available in the assets section of the story.
6.7. Selecting media
When you decide to use a VIDEO related element (VO, PKG or similar), you will have to select which media file should be played out when the time comes. This ID can be either filled in manually or selected from list of clips available for playout (see media management later in this manual). OCTOPUS can be configured to playout all clips you enter here automatically. Therefore you need to be extremely careful when selecting the clip.

VO Element with Clip ID, Name, and IN/OUT Times Completed
To fill in the clip details manually (when there is no integrated Media) just enter the Name and ID of the clip and fill in the IN and OUT points which will set the duration. These are important for director, producer and technicians in control room to control manual playback.
To select a media object from an integrated media server you can right click somewhere in the dark grey area around the media selection form and select MOS > Browse... The MEDIA window will open up and you should be able to see all the available media objects. Once you have found the one you need, select it and click USE in the top left corner of the toolbar. The system will automatically fill in all the fields in the form, including the NAME, ID, IN and OUT times.
MOS-Browse Media Window
If you already know the name of the media file or the end of the ID, just start typing into either of these fields and a list of matching media objects will be displayed for you to choose from, this is the media insight feature.
Media Insight
There is a STATUS indicator above the selection form that says NOT READY by default. This STATUS is typically being received from a third party device and it indicates the state of the selected media file. Once the status we receive changes to READY, the video will be considered as prepared for playout and the duration of the video file will be taken in account rather than the planned duration.
To CHANGE the selected video clip, click in the same field again with the right button of your mouse and select MOS > Browse... Select and USE a different media file and the old one will be automatically overwritten.
To DELETE all the fields from the form, click in the same field again with the right button of your mouse and select MOS > REMOVE CLIP.
(For more details on working with Media, see the Media and How Octopus Controls Devices chapter of this guide)
6.8. Adding MOS objects directly to script editing area
MOS objects added directly to the text should always be concurrent events as the MOS objects duration will not be included in the scripts actual duration. To insert a new MOS object, click with the right button of your mouse in the place where it should appear in the text and select NEW > MOS object. This can also be done by using the shortcut CTRL+M. On the left in the technical area an empty MOS form will appear, where you can will be able to select the media. This works much the same way as described in the Selecting Media chapter above, you can either start typing the name or ID of the media item or choose Browse to open the Browse Media Window. IN and OUT times can be entered in the two time fields on the right of the form. To delete the MOS object use backspace or delete in the editing area.
MOS Object Displayed in Technical Area of Script
Right clicking on the MOS object either in the editing area or the technical area will display relevant options according to your system set up. In addition to the standard options of Browse, Show Clip, Remove Clip there might be options for Creating a Placeholder or Launching an Active-x control.
6.9. Adding CG commands
CGs are automatically taken from the script during live broadcast and they are keyed-in to video. Therefore you need to add a CG command to script for any single person or location you want to display. The quickest way to add a CG is to press CTRL+G while working in the editing area of the script do that, or click the right mouse button in the editing area where you would like to add it and select NEW>CG from the menu. The CG form will appear in the technical area of the script, where you can either:
Select CG Template from CG Form in Technical Area of Script
1) Start typing the name of the CG template you would like to use in the first field and the system will display templates with matching names. Choose the CG device from the drop-down list and enter the IN and OUT points in the two time fields.
2) Or Click on the small button right next to the “CG” letters. This will open up a dialogue window, where you can:
-
Select the template from the first drop-down menu in the top left corner
-
Insert the time when the CG should appear on the screen (IN: field)
-
Insert the time when it should disappear (OUT: field)
-
Type the text of the CG straight into the template as it should appear on the screen.
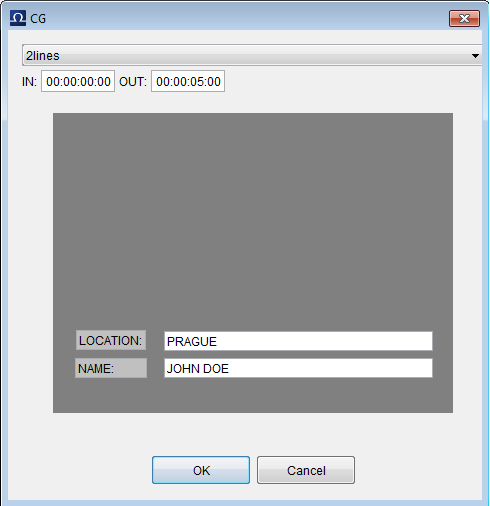
Adding CG Dialogue
-
Click OK when ready or Cancel to leave without saving the changes.
Be careful when writing CGs, because everything that you type here, goes directly on-air and every typo will be seen by audience.
If you want to copy multiple lines of CG text there is an option to Copy Contents available by right clicking on the CG in the text side of the story.

CG context menu
6.10. Story status colour
You can easily monitor the changing status of each story by checking the colour of the story status column, the column header is a '?'. While editing the script the status colour is the first button on the script toolbar, and directly below this will be tick-boxes for changing the story status. Clicking on the status button on the script toolbar or the status column in a rundown or story folder will open the Story States window, tick-boxes are displayed here as well for changing the story state.

Story State Toolbar Button and Tick-Boxes
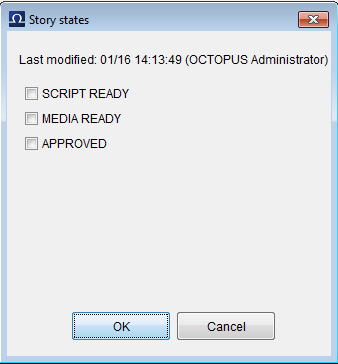
Story State Dialogue
The story states can be configured differently on every Octopus system, but a typical configuration would include a checkpoints for when the SCRIPT is done, VISUALS ready and then READY for air.
The states and colours may differ from this example, but the following is an example of how the story states can be used.
-
RED means the story has been assigned but not written yet.
-
ORANGE means the story has been written and the script has been checked.
-
BLUE means the visuals are ready.
-
GREEN means the script is READY FOR AIR!
Once a script has READY for air status, only users with the MASTEREDIT user right can modify the script, this user right should be reserved for rundown editors.
Story status can be seen like traffic lights, informing others about your work and indicating that it is time for their part of the script writing process to begin.
6.11. Assets
Assets are items attached to a story which are typically used as sources for script writing. Assets can be Wires, RSS, Contacts or Media. See Attaching Items To Stories section in in the Wires chapter and Attachments section in Media chapter of this manual for details on how to attach a wire message to story.
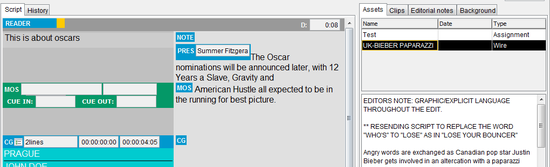
Script with Wire Asset Displayed
The Assets section appears on the right side of the story. To see the list of assets click the ASSETS button on the script toolbar. Left click on the asset and it will be displayed in the area below the asset list, if you double click an asset in the list it will open in a new tab. You can select a block of text and then drag and drop the text between the asset and the script editing area. There are two tabs available in this section, ASSETS and CLIPS. When a Media file is attached, the CLIPS tab will display a list of media and selecting a media item will display the a lowres preview of the media file if available. To REMOVE an asset from the list, simply click on it and press DELETE on your keyboard.
6.12. History
A visual history is available every time you open a script in Octopus. You can find this History if you click on the tab right under the toolbar (red box on the screenshot):
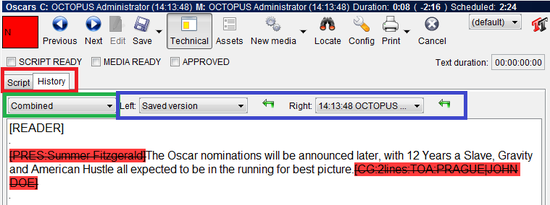
Script History
History will compare two previous versions of your script that have been saved earlier. These versions can be compared SIDE-BY-SIDE or COMBINED in one text field. To select the display option, click on the drop down menu on the left hand side under the toolbar (green box on the screenshot).
To select which two versions should be compared to each other, select version 1 and version 2 in the drop down menus in the middle of the screen right under the toolbar (marked with blue box on the screenshot).
The NUMBER OF SAVED VERSIONS is configurable, however, it has to be your administrator who sets it as it is a global setting.
If you would like to undo all the changes you made since one of the last versions and you would like to revert to a previous stage, click on the GREEN BACK ARROW next to the version drop-down menu.
6.13. Configration options
There are a few additional options you can choose by clicking the CONFIG button on the script toolbar. These options can depend on user rights and the global settings, but usually you will see the following menu after clicking on the CONFIG button:
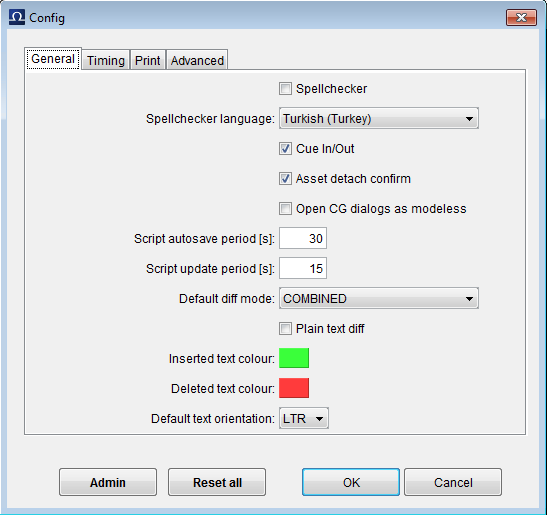
Script Config Options
-
SPELL CHECKER – To turn spell checker ON/OFF
-
SPELL CHECKER LANGUAGE – Select from the languages available on your system
-
CUE IN/OUT – Whether Cue In / Out can be added to the script.
-
ASSET DETACH CONFIRM – Whether or not to be asked if you surely want to detach an asset (or attachment) from the script.
-
SCRIPT TIMECODE FORMAT - Full or Smart timecode
-
CG TIMECODE FORMAT:Full or Smart timecode
-
MOS DURATION MODE: Out time or Duration
-
MOS CUE IN/OUT MODE: Full or Smart timecode
-
SCRIPT AUTOSAVE PERIOD – How often should the system save the script
-
SCRIPT UPDATE PERIOD – How often a script will be updated when in read-only mode.
-
INSERTED TEXT COLOR and DELETED TEXT COLOR – While working in the HISTORY tab, you can preview what changes have been made compared to another version you select. These changes will be highlighted with different colours which can be chosen here.
-
DEFAULT TEXT ORIENTATION – Left to Right or Right to Left. This orientation can be changed in each text field.
-
PRINT MODE – DEFAULT print mode will print scripts in the system default font family and font size, WYSIWYG will print in the font family and font size that you are using on screen, CUSTOM allows choosing from the below font family and font size drop-down lists, FIXED SIZE allows choosing a font size from the below drop-down list.
-
PROMPTER PRINT MODE – The same options as PRINT MODE, but these are applied when you choose Print Prompter from the script toolbar – this option prints only the elements that are sent to the prompter.
Chapter 7. Rundowns and Broadcasting
This is the Editors’ area of OCTOPUS. User rights should be defined by administrators accordingly to allow only Editors' to have full control of over the RUNDOWNS.
7.1. Adding finished stories to rundowns
Once a script is written, edited and visuals checked, it is ready for air. At that point, you can move/copy or assign it from a container into the rundown.
If the story has been created and worked on in the target rundown, there’s obviously no need to move it, however, actions for copying/moving/assigning are still available in case you would like to relocate your story elsewhere. To relocate a story from either a story folder or a rundown, click on the ACTION button on the toolbar, and select either Move, Copy or Assign as required and then select the destination story folder or rundown. You can assign one script to several different rundowns if necessary. This is how you can build the actual on-air rundown, by moving completed scripts from the POOLS area.
An exclamation mark next to the story name reminds you the story is in a rundown (the column header for this column with the exclamation marks is '#'). If it is red, it means this story is in more than one rundown. It is very important to move stories to rundown just from the story POOLS folders, not from an ASSIGNMENT folder where stories are generally not finished or approved.
Stories can also be dragged and dropped into a rundown. The standard rules apply here. When dragged only, the story is moved, when CTRL is held during the drag and drop story is copied and when CTRL+SHIFT is used, story is assigned.
Story to rundown assignment dialogue
Stories can also be dragged and dropped into a rundown. The standard rules apply here. When dragged only, the story is moved, when CTRL is held during the drag and drop story is copied and when CTRL+SHIFT is used, story is assigned.
7.2. Working with rundowns
In the RUNDOWN itself, you can organise the order of stories, number the pages, check your timing and monitor the bulletin as it’s being broadcast.
To change the order of stories within the rundown you can just drag and drop either single stories or multi-select using CTRL or SHIFT and then drag and drop the selection.
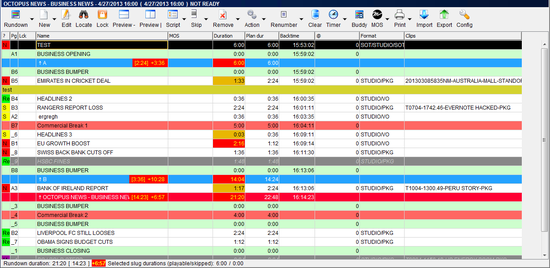
Rundown view
You can put a story on hold selecting it and clicking the SKIP button on the toolbar; (this removes it from timing calculations and prevents it being sent to MOS devices) it is useful to hold extra stories in any half hour, but without them being unskipped unless you need them. Another option for keeping stories in reserve is to move them below the OFF-AIR line, this has the same effect as skipping the stories. To move stories below the off-air line just drag and drop, or to move all skipped stories below the of off-air line click on the CLEAR button on the toolbar.
To open and change story attributes, press and hold SHIFT key while double- clicking the slug, alternatively you can select the slug and the click EDIT on the toolbar. Some fields can be edited inline in the rundown, just click on the cell you would like to edit and press the F2 key. Double clicking the script or clicking the SCRIPT button on the toolbar will open the script, this will initially open in read only mode; double click in the text area or click the EDIT button on the toolbar to edit the script (which also locks the script). It is possible to lock individual scripts or the whole rundown manually to prevent other users from making changes. To lock scripts highlight the script or scripts that you want to lock and click LOCK on the rundown toolbar. To lock the whole rundown you can click on the down arrow next to the RUNDOWN button and choose LOCK, this will prevent other users from making any changes.
7.3. Removing story from a rundown
To remove a story or stories from the rundown, select them and then click the REMOVE button on the toolbar. Removed stories can still be found via the rundown buddy, click on the BUDDY button on the toolbar and then click on the DELETED button on the buddy toolbar; stories in this list can be dragged back into the rundown if necessary. If you select a story and then choose PURGE from the drop-down menu off the REMOVE button, the story will be completely purged from the system – including all locations that the story is assigned to (this is dependant on user rights for each location however).
The story can also be removed from rundowns via the story occurrences dialogue. Double click the exclamation mark next to the story title in the rundown, and then click on the REMOVE button in this dialogue.
7.4. Renumbering slugs
Each slug in rundown has a Page number which is used for quick reference to a slug in the rundown. To renumber the whole rundown, click the RENUMBER button. It is wise to do this only once a day when you think that you have all stories you plan to broadcast in the rundown. Later, as the stories are shifted up and down, the numbers might not be continuous, but renumbering the slugs several times a day can create chaos in the production.
7.5. Rundown timing
You should time your rundowns accurately to make sure the rest of the schedule is not delayed. OCTOPUS can help you to do that by calculating all text and package durations. To be as accurate as possible, all users which will be presenting should set-up their reading speed. Then presenter tags should be added for all studios, GFXs and VOs to allow Octopus to calculate the text time based on the correct reading speed.
The following is a table of the available timing columns which can be easily added or removed by right clicking on any rundown column header and ticking or unticking the column name:
- DURATION
-
The duration of the slug or segment based on the actual text and ready packages included in the story. Feedback from some automation systems can be used to update this field automatically.
- CM DUR
-
Cumulative duration based on DURATION.
- BACKTIME
-
The time that this slug should start in order for the show to finish exactly at the end of the planned duration of the rundown, this is calculated using DURATION.
- HIT TIME
-
If F9 or F11 is pressed while the slug is highlighted this will enter the current time into the Hit Time field and recalculate all subsequent hit times based on the DURATION of each slug. Backtime will also be recalculated when F9 or F11 is pressed.
- PLAN DUR
-
The planned duration for this slug, this is manually entered when the story is created.
To avoid including media placeholders in the DURATION field, only READY media packages will be used to calculate the DURATION field, when the media is NOT READY this field will be based on the PLAN DUR (while editing the story the D: field of the package element will be highlighted orange to indicate that DURATION timing will not be of the NOT READY media).
Off-Air lines and segment lines will show the PLAN DUR for the rundown or segment respectively in square brackets and next to this the under/over time, its possible to configure custom colours to indicate when the show timing is under/over or even with the PLAN DUR. Typically if the rundown is over the PLAN DUR, the over time will be highlighted red.
The bottom line of the screen also shows you timing information for the whole rundown. The first time in the square brackets is the planned duration of the rundown, next to this is the under/over time. You can also see block durations in this line, to count the duration a block of stories in rundown, press and hold the CTRL or shift keys to highlight the selection.
7.6. Hit time field
This is a simple time field that allows you to add the exact start time for the selected slug by pressing F9 or F11. Pressing F9 or F11 will enter the current time into the HIT TIME field and recalculate all subsequent HIT TIME times based on this; BACKTIME will also be recalculated and the rundown under/over time will be modified. To clear a time from the HIT TIME column press Shift+F9 or Shift+F11. Double clicking on the HIT TIME column will allow entry of any time and allows deletion of previously entered HIT TIMES times.
7.7. Monitoring timing while ON-AIR
While the rundown is ON-AIR, you can monitor the timing by clicking the TIMER button on the toolbar. There are a total of six clocks displayed, the first three are for the rundown; Count-Up, Count-Down and Under/Over time (based on total planned rundown duration). The fourth and fifth clocks display a Count-Up and Count-Down for the current slug (based on DURATION); the sixth clock displays the under/over time for the previous slug based on DURATION. If you want to start the timer without setting the hit time times, you can press F10 to start timing each slug.
7.8. Assigning presenters at rundown level
In addition to assigning the presenter in the script text using presenter tags, it is also possible to assign presenters in the rundown edit dialogue. Click the down arrow next to the rundown button on the rundown toolbar and choose Edit. As in the screen-shot below, you can add presenters for the whole rundown either by typing their names into the text field above the Presenters list, or by clicking the button and choosing the presenter names from the multi-select list.
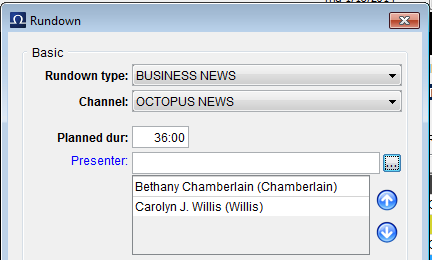
Adding Presenters to the Rundown Edit Dialogue
Once you have assigned the presenters for the rundown, you can then choose from two options on the menu associated with the Rundown button on the toolbar “Assign Presenters to All Slugs” or “Assign Presenters to Selected Slugs.” These options will assign the presenters consecutively to either the whole rundown or the selected slugs, the assigned presenter can then be seen in the presenters column.
Presenters column with two presenters assigned consecutively
If a presenter is assigned inside one of the scripts, this will override the presenter set at rundown level; in this case the presenter name will be bold.
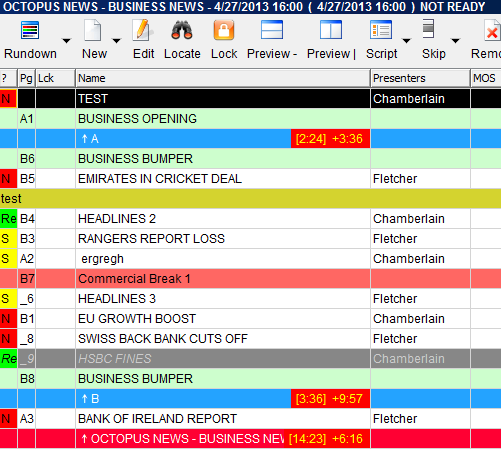
7.9. MOS activation
When a rundown is made MOS active for a connected device (for example prompters, video playout servers or CG devices), a playlist of MOS objects associated with that system will be sent to the device. Once the rundown is MOS active any changes to the Octopus rundown will be sent immediately to the connected device.
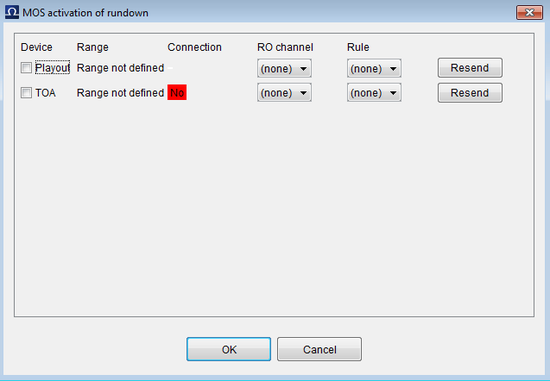
MOS activation of Rundown Dialogue
For 24 hour news channels, rundown MOS activation is typically set up to be automatic for a range of rundowns. Ask you system administrators if you require changes to the automatic MOS activation range.To activate a rundown, click on the MOS button on the rundown toolbar. This will display a list of all connected devices, check the box next to each device that you want to activate the rundown for and then click OK. If you want to force Octopus to resend the rundown to a particular device, click the resend button in this dialogue. RO channel can be selected here if your automation system has multiple channels like News or Production. For automation systems that have multiple playout channels, a rule can be selected here to automatically assign clips alternately to particular playout channels like A,B. Some systems also require the rundown to be marked as ready for air, the Toggle Ready option on the MOS button will mark the rundown as ready for air.
7.10. Rundown buddy
Clicking on the BUDDY button on the rundown toolbar will open the rundown buddy. The buddy provides an alternative view on the rundown, by clicking on the relevant tool bar buttons you can view either ALL, SKIPPED, UNSKIPPED, READY, NOT READY, or DELETED items from the rundown. The buddy also has toolbar buttons CG, PROMPTER and VIDEO; CG will display CG's that are included in the rundown, PROMPTER will display only the text that is being sent to the prompter and VIDEO will display a list of Video clips that are included in the rundown.

Rundown Buddy Toolbar
7.11. Creating a new rundown
To create a new rundown you can click on the down arrow next to the RUNDOWN button on the rundown toolbar and then click the NEW button. Another option is to locate to the Broadcasting - Rundown Playlist folder in the main menu and then click on the new button. The dialogue for creating the new rundown, select show type, channel and template from the provided lists. Fill in the the planned duration, and the start time and date of the bulletin. Connect indicates whether the show is connected to previous one, when connected the rundowns start time will be equal to the end time of previous rundown, otherwise the exact specified start time will be used. You can also create a rundown without entering a start time, just choose the “Named” option and enter the name for the rundown. This rundown will appear under Named folder in Select show dialogue afterwards. Automatic actions can be applied to the rundowns at a set number of hours days or weeks after the scheduled start time. If it is left blank the rundown will remain active in the system indefinitely, it is a good idea to choose archive or delete after a suitable time frame to avoid unnecessarily taking up database space. Next click on the OK button and the new show will appear in the list and editors/producers can start filling it with slugs.
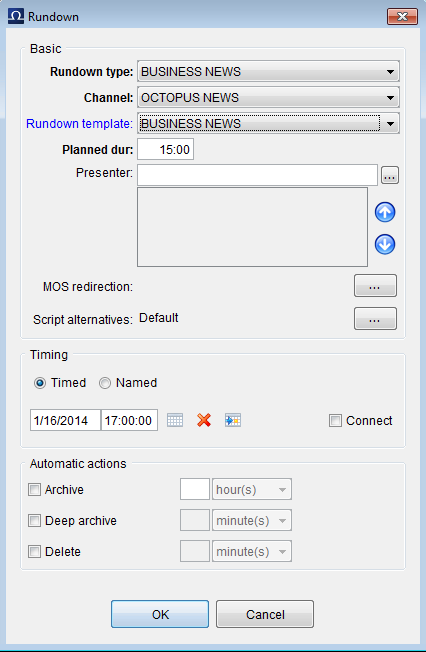
New Rundown dialogue
7.12. Deleting rundowns
To delete a rundown you can click on the down arrow next to the RUNDOWN button on the rundown toolbar and then click the DELETE button. Another option is to locate to the Broadcasting - Rundown Playlist folder in the main menu and select the rundown then click on the DELETE button. You will be asked to enter 'yes' into the confirmation dialogue. When you delete a rundown, any stories that are assigned to other rundowns will remain in the other rundowns.
7.13. Archiving rundowns
To archive a rundown manually you can click on the down arrow next to the RUNDOWN button on the rundown toolbar and then click the ARCHIVE button. Another option is to locate to the Broadcasting - Rundown Playlist folder in the main menu and select the rundown then click on the ARCHIVE button. You will be asked to enter 'yes' into the confirmation dialogue and then the rundown will be archived complete with all stories and attachments. Any stories assigned to other rundowns will remain in the other rundowns.
Chapter 8. Uploading files
Files of all types can be uploaded to OCTOPUS. They are stored on the server and can be tagged and/or linked to objects such as story, assignment etc. If the file contains text information, it is extracted and indexed for fulltext search. Uploading a file is simple - just drag and drop it over assets area in the script or into similar place in an assignment. You can also drag and drop a file to a topic bin or you can use New>Upload file... menu action where available.
Chapter 9. Tags and Topic bins
9.1. Basics
Tags are wery popular feature present in many applications nowadays. They allow simple, user-friendly, content categorization. There is no need to build a dictionary beforehand, users will just add new tags as they go. It is a good idea to set some general rules for tag creation at the beginning, however. Almost any of the basic data types can be tagged - most notably stories, assignments and uploaded files.
9.2. Stories in story folders, rundowns
There are two ways how to edit tags associated with a story. You can either use story edit dialogue or it can also be done via inline editing (via F2) in the list. Every tag has a small "x" icon on the right, clicking on that will remove the tag from story. If you want to assign existing tag or create a new one, start typing. Whisperer popup will offer exiting tags starting with letter you typed and also allow you to browse (you can also use F4) or create a new tag directly from what was typed in. In both cases changes are only saved after confirming either the dialogue (CTRL+Enter or click on button) or list editor (Enter).
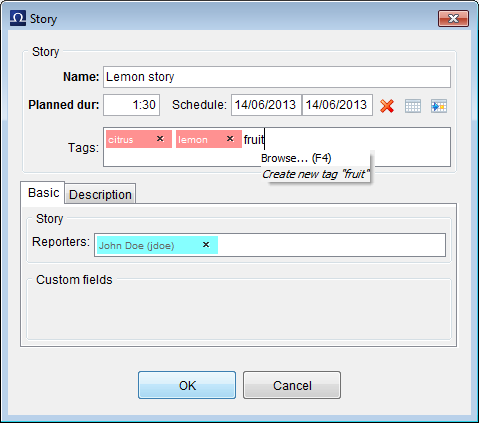
Tag Creation in Story Edit Dialogue

Tag Editing in the List (Inline)
9.3. Topic bins
Topic bins are "baskets" showing all objects assigned to given tags. You can either have "searching" basket where tags needs to be entered into filter in order to show objects or you can ask your administrator to put into menu links to objects assigned to some specific tags. You can also drag objects into opened topic bin, this would assign dropped objects to given tags, this applies to both OCTOPUS objects (stories, wires, media, ...) and external objects such as texts, links (URL) and files. For last three mentioned you can also use "New" toolbar button.
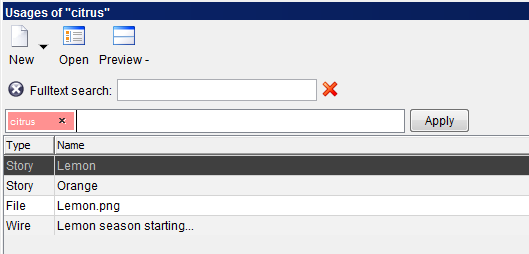
Topic Bin with Filter
Chapter 10. Media and how octopus controls devices
OCTOPUS can be connected with various third party devices like automation systems, video servers, graphic systems, CG machines, stillstores and others. This is achieved by using the MOS protocol to communicate with these devices. Content from these devices can be browsed and searched in the OCTOPUS media management window and rundowns are passed to MOS device for playout.
This brings extra functionality to your text based newsroom system. You can browse content of all video servers, write CGs that go directly to CG machine and of course all changes in to the rundown are immediately reflected in an automation playlist. But this also means you have greater responsibility; you should carefully spell check all your CGs and not “play” with rundown when it should be on-air in seconds. These are great features, but you should be very careful as your audience will see even small mistakes.
10.1. Media
The MEDIA folder can be found within the BROADCASTING section of the main menu. The MEDIA folder contains a list of all media objects that have been published to OCTOPUS by MOS connected devices. There are several views available, MediaGrid and MediaExtended both include thumbnails if they are available. Media titles and metadata is indexed which allows fulltext searching for items. The media toolbar contains buttons for opening active-x controls if they are available for the media item, these include the PLAYER, BROWSER and EDITOR. To add a media item to a story you should use drag and drop as described in the scripts section of this guide; to see which stories a media item has been used in, click the Clip Usage button on the toolbar.
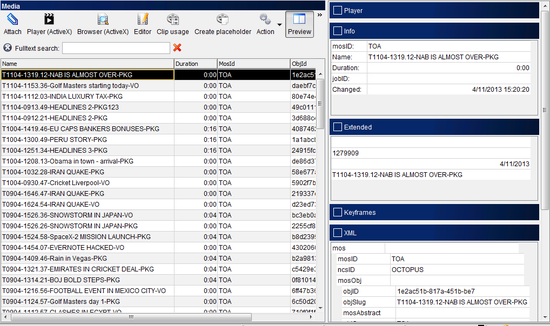
Media management
10.2. Lowres preview and media object details
To see a lowres preview of the media, click on the PREVIEW button on the toolbar; a preview player will be displayed on the right of the screen, click on play. Keyframes may also be available, clicking on a keyframe will move you to that frame in the preview player. Low resolution video can even be played out from the mediagrid and media extended views by clicking on the play icon on the thumbnail. In case you’d like to obtain additional information about a media object, this is also available by clicking on the PREVIEW button on the toolbar. Object details will be displayed in the INFO and XML sections of the preview. The amount of detail shown here depends on the Media Object Server which sends these details to OCTOPUS.
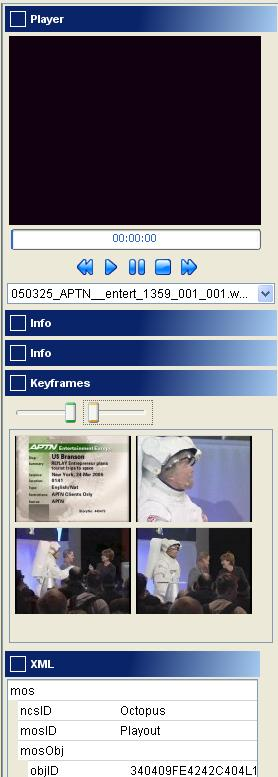
Media Preview
10.3. Attachments
Media can be attached to stories in exactly the same way that wires can be. To attach a media object to a story use either the Attach dialogue, or drag and drop a media object to desired story's assets section.
10.4. Placeholders
Depending on the system it may also be possible to create a placeholder for media that does not exist yet by clicking on the CREATE PLACEHOLDER toolbar button; then when the media becomes available it can be associated with this placeholder and timing of any scripts and rundowns containing this placeholder would be automatically updated.
Chapter 11. My octopus
11.1. Profile
Every user should fill in all the fields in the My Octopus > Profile section. These fields not only help other users to find contact details, but in some cases other functionalities can depend on them.
Besides the Basic information, such as SHORT NAME, LONG NAME, BIRHT DATE, SEX AND TYPE, that should not be changed you should fill in you email address, mobile numbers (in some cases system can be configured to be able to send user to user short text messages (SMS) to the mobile devices; in that case, filling in your mobile number is even more important.
The most important part of the profile setting is the button. Every user should set his/her reading speed before doing anything else with the system. This information will be used by the system to calculate the duration of a text field in the script, based on every users reading rate.
The way how you set your reading speed is:
-
Click the button
-
If the language of your TV station is other then English, delete the default text and paste some random text in the text field. It should be some text in your language, copied from any source – Wires, Internet, local folder on your PC, etc.
-
Click the button and read the whole text as if you were on air – read loudly, articulate, make sure that nobody is disturbing you.
-
Click when finished
-
Repeat steps 3. and 4.
-
Repeat steps 3. and 4.
-
After you have read 3 times, the 'OK' button will be activated. If you are happy with the result, you can click OK (it will save it) or to start it all over or if you would like to do it later.
You can try and set your reading speed any time.
Chapter 12. Contacts and guests management
12.1. Contacts
OCTOPUS Contact management consists of three user sections – Contacts, Bid list and Guest list. The Contacts section is mainly focused on contact details and information about the person, but it also has an extension for using the contact in CG's added to stories. The Bid section is a list of all current invitations to contacts to appear on shows. Information about communication with contact can also be added. When a bid is confirmed, it will move from the bid list to the guest list.
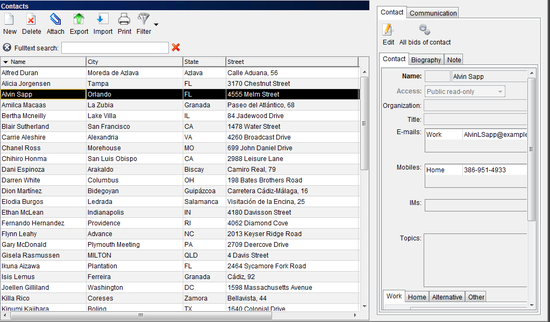
Contact list
The Contact section is a list of all of the journalists contacts. This section is divided into two parts – the list of contacts on left and contact details on the right. To create a new contact, click the NEW button on the left of the toolbar. In the contact details section on the right, click the edit button and you will see three tabs: Contact, Biography and Note. The only mandatory field is the name of the contact. To delete a contact is very straightforward, just click the DELETE button on the toolbar while the contact is selected in the list.
Contacts can be imported/exported in the vCard format. Other contact management systems like MS outlook can export contacts as vCards. To import a vCard file, click Import on the contact toolbar and browse for the file.
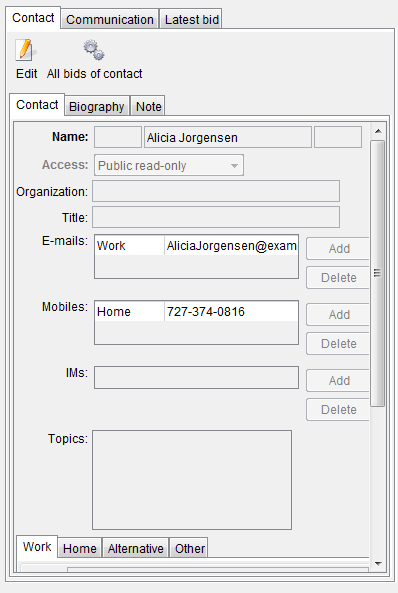
Contact Details
Descriptions of the fields are provided below:
-
Name – The name of the contact should be entered into the middle field. The first field is for the contacts title and the third can be used for qualifications.
-
Access – Accessibility of contact information to other users. Possibilities are PUBLIC (everyone can read and modify), PUBLIC-READ ONLY (everyone can only read), PRIVATE (only creator can access) and CUSTOM. With Custom access, it is possible to specify user(s) or group(s) with the right to read(R)/modify(M)/delete(D) the contact. When custom access is selected, a new button will appear next to this combo, clicking this button allows selection of the user and group rights.
-
Organisation – The organisation that this contact represents.
-
Title – The contacts job title within the organisation.
-
E-mail – E-mail addresses for the contact can be entered under categories Home/Work/Other.
-
Mobile – Mobile numbers can be entered for the contact under categories Home/Work/Other.
-
IM – Instant messaging ID's (for example a Skype ID) can be entered here. The list of available providers can be modified by your system administrator.
-
Topics – This is a list of topics in which the contact has expertise. To view a list of all previously entered topics, click the '…' button next to this list. If the desired topic doesn't exist, simply type it directly into the text field and a new topic will appear in the list. These can then be used when searching for contacts that are knowledgeable in a particular topic.
-
Work/Home/Alternative/Other address fields – They can be used for address of contact. Each of them can contain different address.
-
Used for CGs – Completing the text for CG's allowing this contact to be easily added to CG templates. The first line displays the name of the contact, the second and third lines should match the typical input for your two or three line CG templates.
-
Tags – This is a list of tags or keywords related to this contact. To view a list of all previously entered tags, click the '…' button next to this list. If the desired tag doesn't exist, simply type it directly into the text field and a new tag will appear in the list. These can then be used in place of contact groups, all contacts that you would like to be returned in a search for a particular keyword can have a relevant tag added here.
-
Biography – This is available in the second tab within the contact details section. A brief biography for the contact should be typed into this text field.
-
Note – The third tab within the contact details section. Any additional information can be entered here.
Every contact also has a history of communication between journalists and the contact. This is accessible after clicking the Communication tab in contact details.
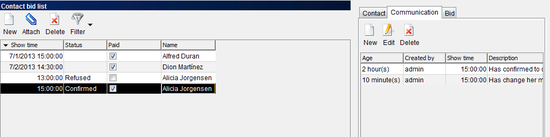
Communication with contact
Details of more communication can be added after clicking the NEW button. It will open a dialogue with the option to enter the time of communication and the details of the discussion. The communication tab for the contact will also display communication added using the bid/guest sections of OCTOPUS.
In the figure above, there is also a third tab called 'Latest bid.' This one will appear when a bid for the contact is made. More on Bids can be seen in the following chapter.
12.2. Bid list
The bid list shows a list of all current bids. The bid itself is an invitation to a contact to be interviewed on a show. For example, when preparing a story about changes to the constitution, it might be useful to get an opinion from a contact who is an expert in politic sciences, so a bid for this contact would be made in OCTOPUS. An important property of bid is its status. Once the contact has confirmed availability for the show, the status would be changed to confirmed and the bid would then be moved to the guest list. Other statuses such as refused or new can be added, the configuration of bid statuses is done in the Administration-Bid statuses section.
The bid list section is divided to two sections in same way as the contacts section. On left side, there is list of all bids. Details are can be seen on right side. Please see the image on the following page.
Another way to view bids for a particular contact is to view the 'Latest bid' tab in the contact details.
You can also view all bids for a particular contact by clicking the button ALL BIDS OF CONTACT. This button can be found in the details section of every contact/bid/guest.
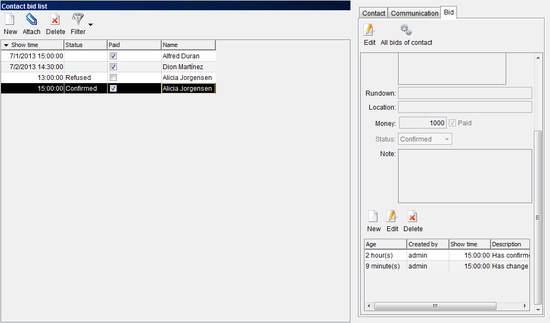
List of All Bids for Contact

Bid list section. List of bids is on left side. Details of on right side.
Each bid has the following properties: Show time, Topics, Tags, Rundown, Location, Money, Paid, Status and Communication. These are described in detail below.
-
Show time – The time and date of the show on which you would like the contact to be interviewed. This option is mandatory.
-
Rundown – For which rundown/show the bid is created.
-
Location – The location at which the meeting or interview should take place.
-
Money – If the contact will be paid for the visit, you can enter the amount here.
-
Paid – Check box for paid status, to indicate whether the guest has been paid or not.
-
Status – A drop-down list of the available statuses. Generally if a bid has the Confirmed status it will be moved to the guest list. The list of status should be created by your administrator, and the confirmed status or equivalent should be marked as 'Move bid to guest list'.
It is possible to created a new bid from two different places. The first option is to go to the Contact section and click the 'New bid' button. After the fields are completed, it is necessary to save the bid by clicking the 'Save button.' The second option is go directly to Bid list section and click the NEW BID button.
12.3. Guest list
The guest list is used to display only the confirmed bids separately. All bids with confirmed status will be displayed here. The layout is the same as the bid list and all contact/bid information can be edited in the same was as the Bid list.
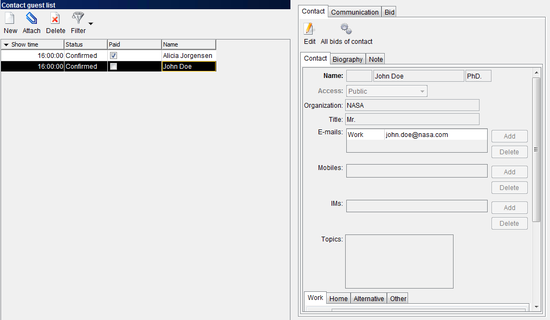
Guest list
Chapter 13. Fulltext search
13.1. Local fulltext search
Folders in OCTOPUS have a local Fulltext Search, this includes Story Folders, Wires and RSS, Media and Contacts. This allows you to quickly search the body text of wires/stories, media metadata, or details of contacts while you are working in the relevant folder. Left click in the fulltext search query entry box and enter the keywords that you are looking for. This type of search supports entry of one or more keywords, entering more that one keyword will return results including only items that contain all of the keywords.

Local Fulltext Search in Media Section
13.2. Search spotlight
Using the spotlight search you can quickly run a fulltext search in all story folders, Wires and RSS, Media and Contacts at the same time. Type the keywords into the search section at the top right of the screen, then press Enter. Another option is to click on the magnifying glass icon at the top right of the screen, enter the keywords at the top of the search window and then click the search button. It is possible to narrow the results down by ticking only the type of object that you are searching for – Stories, Wires, Media or Contacts. Another option for refining the search is to choose a particular date using the calendar or by directly entering a valid date into the date entry box.
-
If you enter two keywords to be searched the space is interpreted as AND, so "Hillary Clinton" will find all matches that have both words in the document.
-
You can use the operator OR, "Hillary OR Clinton" will find all documents that have either Hillary or Clinton.
-
OR can be used together with AND, "Hillary or Bill Clinton" will find any matches that have Hillary and Clinton or Bill and Clinton inside the document.
-
Searches will automatically search for multiple variations of the root word, for example a search for "corrupt" will return results that include any of the words corrupt, corruption, corrupted etc.
-
You can use an exclamation mark to search for an exact word, so "corrupt!" would only return documents that include the word corrupt, not documents with the word corruption.
Spotlight Search Window
The results of the spotlight search are displayed in a list as seen above in the Spotlight Search Window. Initially the search results are listed according to relevance, so if for example a message contains “France” more than once it will be higher in the list. By clicking on the column headers, you can sort the list according to Date or Type, clicking again will switch between ascending or descending order. Double clicking on an item in the list will open it in a new tab and you can then drag and drop this tab header to another location – for example drag a media item onto a package element in a script. It is also possible to drag and drop items from the spotlight search results list to another folder in OCTOPUS.
Chapter 14. Stories trash
When you delete a story from a container or rundown it will be moved to the trash by default. Unless the item is restored, the story will remain in the trash for 5 days until it is purged. The items you will see in the Trash is dependant on user rights, if you have the right to read own items you will see items that you created, or if general read access has been granted then all trash will be displayed – anything you have read access to you should be able to preview or restore by selecting the item and clicking on the a preview or the restore button. It is possible to delete selected items or to empty all contents of the trash by clicking the DELETE or EMPTY TRASH, this again is dependant on user rights whether you will be able to able to delete your own items, all items or nothing.
14.1. How to restore a story from trash
To restore a deleted story, select it from a list and press RESTORE button. You will then be presented with a list of containers, choose the one you would like to restore the item to and click the OK button. Double clicking on an item in the list will also start the restore action. You can select multiple items to restore using Ctrl/Shift +left click. Dragging and dropping stories to a container will also restore them.
Trash list
Chapter 15. Stories archive
OCTOPUS will often be configured by your administrators to archive rundowns automatically, in addition to this if you want to store a permanent copy of a story from a container that has never been in a rundown you should manually archive the story. Stories can be archived from any of the containers or rundowns. Also whole rundown(s) can be archived manually.
15.1. How to archive
Select the story or stories from the list while in a container or rundown and click on the down arrow next to the Action button on the toolbar, from there you can select Archive Story. You will be prompted to confirm that you would like to archive the story by typing Yes into the box in the confirmation dialogue. If you are archiving a story from a story folder, check that it is not assigned to a rundown (there would be an exclamation mark in the column with the header '#' if it is assigned to a rundown). Archiving a story that is assigned to a rundown will result in the story being removed from the rundown as well as the story folder. To archive the whole rundown manually click the down arrow on the Rundown button on the rundown toolbar, choose Archive and then confirm in the same manner as with archiving a story. Whether or not users can archive their own stories/slugs, archive any stories/slugs, or archive an entire rundown is managed by user rights, these can be applied for each story folder and show.
15.2. How to find a story in the archive
To find a story in the archive use your SEARCH function described above. Using advanced search options open Columns tab, click archived column, choose that you want to look for archived stories only. Same way you can enter reporter’s name if you know it. Then write your search query. Don’t forget to select correct date range. Try to select date range as narrow as possible as this would speed up your search a lot. To see a script of founded archived story, hit SCRIPT button. You can also copy story from archive to one of the containers by pressing COPY button in toolbar and selecting one of containers.
Chapter 16. Reports
16.1. Basics
Reports allow users to export aggregate statistical data about stories and their usage in rundowns. You can set limits to channel(s), show type(s), user(s), tag(s), date range, etc. You can also group results by day, month, year, tag, user or group. As far as date range is concerned, this can be set for every report execution - you can keep reusing one report and only update date range every time.
16.2. Definition
There are three tabs in report edit dialogue - Basic, Locations and User.
In Basic tab you can limit story set by tags and date range. If you check "Relative" checkbox next to dates, OCTOPUS will remember dates not as absolute dates but as offset to current date. If you, for instance, set dates corresponding last week on Monday, run on next Monday would process current week. If you archive aggresively, you might want to include archived stories - keep in mind such stories are no longer present in story folders (but they keep the link to rundown, if it was archived en bloc). In Output part you can select grouping you want, if you want to see amount of stories per day, choose day, if you would like to have stories broken down by user, select user etc. If you check "Include story list", names of individual stories will also be part of export.
Warning
Think twice before attempting to get report for unreasonably long period such as one year - it might put significant load on the system and such reports are likely to time out anyways. Reasonability depends on amount of stories, your server hardware, amount of users, it is recommended to start low and increase report limits gradually.
Basic tab
In Locations tab you can select story folders, channels and show types to be included in results. If you don't select anything, OCTOPUS will behave as if there was no filter (ie. processes all).
Report Execution
In Users tab you can select user and/or groups to be searched. If you don't select anything, OCTOPUS will search stories created/owned/reported by all users.
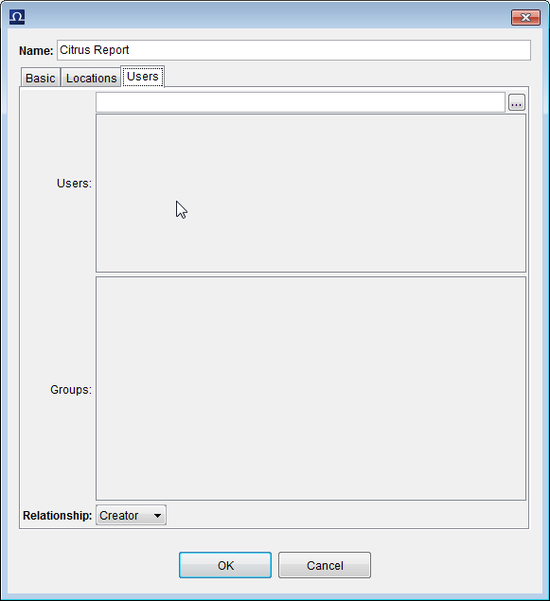
Report Execution
16.3. Execution
Once report is created you can execute it via "Execute" action. Results will be opened in new tab. You can change date range and re-execute it if necessary. You can also save result into CSV or XML by clicking "Save As..." toolbar button.
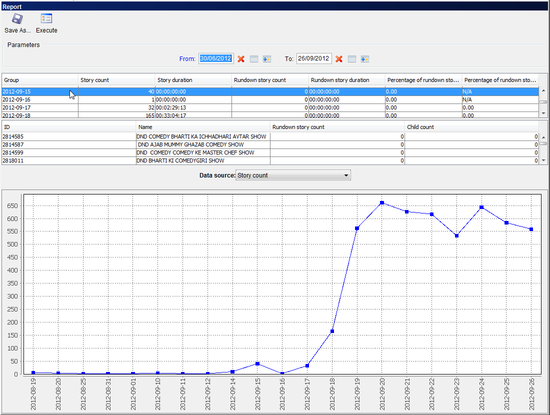
Report Execution
Chapter 17. CG control
17.1. Introduction
There are two ways that OCTOPUS can be integrated with CG devices, either via MOS or by using CG Control (this chapter covers only CG Control) with Chyron or Aston drivers to send CG's via a serial connection to the CG device. The CG control interface sends the text entered in CG's in OCTOPUS stories along with a template number to the CG device. The CG device will then add the text to the matching template and render it. Whenever changes are made to an OCTOPUS rundown, these can be automatically sent to the CG device via CG control.
17.2. CG control interface
Your administrators will need to add the CG control option to the OCTOPUS main menu; clicking on the CG Control option will open it in the current tab.
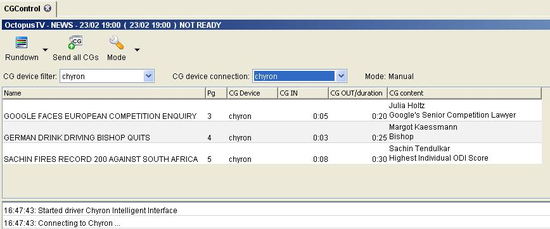
CG Control tab
There are three buttons on the toolbar. The Rundown button opens the rundown selector dialogue from which you can choose the rundown to work with, this works the same way as the Rundown Selector for normal rundowns. The down arrow on the Rundown button allows selection of the previous or Next consecutive rundowns. The Send All CG's will send all CG's to the selected CG device connection. Clicking the down arrow on the Mode button allows selection of either Automatic or Manual modes (which will be described in more detail below). There are two drop-down boxes below the toolbar; the CG device filter allows you to display only CG's for a particular device and CG device connection allows selection of the device connection appropriate for the CG device connected via serial cable to your OCTOPUS client machine (The options in both of these lists are configurable by your system administrators – see OCTOPUS6 Admin Guide).
There are three buttons on the toolbar. The Rundown button opens the rundown selector dialogue from which you can choose the rundown to work with, this works the same way as the Rundown Selector for normal rundowns. The down arrow on the Rundown button allows selection of the previous or Next consecutive rundowns. The Send All CG's will send all CG's to the selected CG device connection. Clicking the down arrow on the Mode button allows selection of either Automatic or Manual modes (which will be described in more detail below). There are two drop-down boxes below the toolbar; the CG device filter allows you to display only CG's for a particular device and CG device connection allows selection of the device connection appropriate for the CG device connected via serial cable to your OCTOPUS client machine (The options in both of these lists are configurable by your system administrators – see OCTOPUS6 Admin Guide).
17.3. Automatic and manual CG triggering
CG Control supports two ways of triggering CG's, manual and automatic. The mode can be changed using the Mode button on the toolbar as discussed above. In manual mode CG's are sent by selecting the CG in the rundown and then pressing the Space key; pressing Space will also select the next consecutive CG in the rundown to allow moving through the rundown by continuing to press the Space key. Double clicking on a CG will also send it to the device.
Automatic mode sends all CG's in the selected rundown to the CG device. If changes are made to CG's in the rundown or if slugs are renamed/moved/skipped/deleted these changes will be sent automatically to the CG device. Under automatic mode, although CG's are sent automatically they will not be rendered automatically. You will need to use the systems provided by your CG Device vendor to bring CGs on screen at the appropriate time.
The lower window in CG control shows messages related to connection and delivery of the CG's. Errors here may indicate a problem with the connection or the CG device itself.
Chapter 18. Shortcuts
18.1. Shortcut manager
Some of the shortcut keys in Octopus can be configured using the Shortcut Manager; the Shortcut Manager can be opened by right-clicking on the Octopus server name at the bottom of the screen and choosing Set up Shortcut Keys.

Choose Set up Shortcut Keys from Menu
There are two lists of shortcuts available in the shortcut manager; Desktop and General, click either the Desktop or the General button on the left according to which list of contacts need to be changed.

Shortcut Manager Section
To change one of the shortcuts, select the action/shortcut in the list and then left click on box below that displays the current shortcut key combination for this action, now click the Remove button which will delete the current shortcut key combination. Next, click on the pink row at the bottom of this section with the message “Focus here and press the key combination to create the shortcut”, and press the desired key combination. Follow this procedure for each shortcut that needs to be changed and then click save on the toobar.
System administrators have the ability to change shortcuts for all users, please ask them for help if this is necessary.
Table 18.1. Common list shortcuts
| Shortcut | Description |
|---|---|
| Ctrl+E | Edit selected item. |
| Ctrl+N | Create New item. |
| Ctrl+M | Move the selected item. |
| Ctrl+C | Copy the selected items to another location. |
| Alt+H | Open Horizontal Preview |
| Alt+V | Open Vertical Preview |
| Ctrl+P |
Table 18.2. Common editing shortcuts
| Shortcut | Description |
|---|---|
| Ctrl+A | Select All |
| Ctrl+X | Cut |
| Ctrl+C | Copy |
| Ctrl+V | Paste |
| Ctrl+B | Bold formatting |
| Ctrl+I | Italic Formatting |
| Ctrl+U | Underline text |
| Escape | Cancel or Close |
| Ctrl+S | Save and Close |
Table 18.3. Wires/RSS list shortcuts
| Shortcut | Description |
|---|---|
| Ctrl+T | Opens Attach wire dialogue. |
| Ctrl+I | Send the wire via messaging. |
| Ctrl+H | Go to source page for RSS feed (More button) |
| Ctrl+O | Comment on the wire. |
| Ctrl+R | New Notification rule. |
| Ctrl+D | Delete the selected items. |
Table 18.4. Story folder list shortcuts
| Shortcut | Description |
|---|---|
| Ctrl+Shift+P | Print Script. |
| Ctrl+Alt+P | Print Prompter. |
| Ctrl+R | Remove story from the folder. |
| Ctrl+Shift+R | Purge story from all assigned locations. |
| Ctrl+S | Open Script editor. |
Table 18.5. Rundown shortcuts
| Shortcut | Description |
|---|---|
| Ctrl+↑ Ctrl+↓ | Moves slug up or down in the list. |
| F9 F11 | Starts timing the current slug and sets the hit time time. |
| Shift+F9 Shift+F11 | Stops the timer and clears hit time time. |
| F10 | Starts timing the current slug, but without setting the hit time time. |
| Ctrl+S | Open Script editor. |
| Delete | Removes the selected slugs from the rundown. |
| Insert Alt+Shift+N | Creates a new story slug in the rundown. |
| Ctrl+G | Add a new segment to the rundown. |
| Ctrl+J | Add a new Jingle. |
| Ctrl+B | Add a new Break. |
| Ctrl+L | Lock the selected slugs. |
| Ctrl+K | Skip or Unskip the selected slugs. |
| Ctrl+T | Display the Timer. |
| Ctrl+U | Open the Rundown Buddy. |
| Ctrl+Shift+P | Print Script. |
| Ctrl+Alt+P | Print Prompter. |
| Ctrl+R | Remove story from the rundown. |
| Ctrl+Shift+R | Purge story from all assigned locations. |
| Alt+Shift+K | Skips and Clear the selected slugs. |
| Ctrl+Right Arrow | Move to the next scheduled rundown. |
| Ctrl+Left Arrow | Move to the previous rundown in the schedule. |
Table 18.6. Script editor shortcuts
| Shortcut | Description |
|---|---|
| Ctrl+F | Save (without closing) |
| Ctrl+Shift+F | Save as... |
| Ctrl+T | Show/Hide Technical area of script. |
| Shift+Ctrl+A | Show/Hide story Assets. |
| Ctrl+G | Add a CG. |
| Ctrl+R (While cursor is in a MOS object field) | Removes clip from element or MOS command. |
| Ctrl+1 | Create a new MOS object using ActiveX |
| Ctrl+K | Add a command |
| Ctrl+O | Add a note |
| Ctrl+T | Add a Tag |
| Ctrl+P | Add a Presenter |
| Alt+I | Ignore Text |
| Alt+D | Don't count text |
| Ctrl+R | Change text colour to Black |
| Ctrl+E | Change text colour to Red |
Chapter 19. Problem reporting tool
19.1. Introduction
Octopus client has built in problem reporting tool. You may use it to report any kind of trouble with the application.
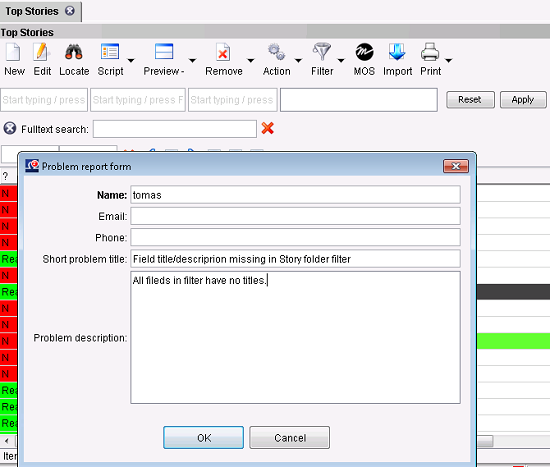
Problem reporting tool
19.2. Submitting problem report
To open the tool, press Ctrl+Shift+F12. This will bring up the Problem report form where you can describe the problem. Once submitted, compressed client logs, screenshot and your description of the problem is uploaded to Octopus server to octopus\server\data directory under current month and date folders. Notify administrator about the report.
Appendix A. Keyboard shortcuts
Table A.1. Script
| Description | Shortcut |
|---|---|
| Save | Ctrl+S |